< Previous | Contents | Next >
Each clip has an Opacity parameter, available in the Inspector, that lets you make it more transparent, in a range from 0 (totally transparent) to 100 (totally opaque). When set to a value less than 100, the selected clip is mixed with whatever clip is underneath it on the Timeline, according to the composite mode that’s currently used. If no clip appears underneath the Timeline, then the clip is mixed with black.
By keyframing this parameter, you can create more complicated fade to black effects or cross dissolves. Keyframing is covered in more detail in Chapter 53, “Keyframing Effects in the Edit Page.”
— Select the clip you want to adjust, open the Composite controls in the Video Inspector, and set the Opacity slider to create the desired amount of transparency.
![]()
Video Fader Handles
If you want to dissolve a clip to or from another clip, or to or from black, the traditional way to do so has been to use one of the transitions in the Effects Library. However, you can also use fader
handles that appear at the beginning and end a clip when you position the pointer right over it. Fader handles are a fast, ubiquitous method of creating a fade to or from black. However, they also make
it easy to fade to or from other clips that are underneath one that’s superimposed, as seen in the following screenshot.
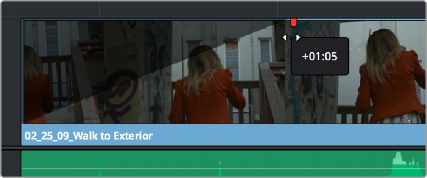
Dragging a video fader handle on a clip in track V2
To use a fader handle, move the pointer over the clip you want to adjust, and when small white fader handles appear at the upper left and upper right of the video of the clip, drag them to the left or right for the duration you want the fade effect to last.