< Previous | Contents | Next >
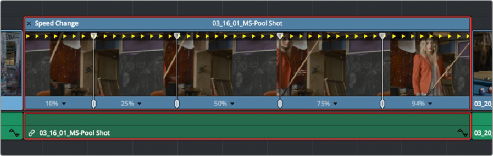
five speed segments that start at 10% and increase progressively to 30%, 50%, 70%, and then 90%. Once created, you can drag the speed points to customize this effect to create whatever durations you require.
Speed effect controls set to create a gradual ramp from 0 to 100 percent playback speed
Closing Retime Controls
When you’re finished creating your Retime effect, you can close the Retime controls so that clip assumes a normal appearance again. Closing the Retime controls has no effect on the timing of the clip, it just ensures you cannot accidentally modify the speed of the clip with the mouse.
![]()
— Click the X button at the upper left-hand corner of the Retime control box.
— Press the escape key.
— Select the retimed clip, and either choose Clip > Retime Controls, or press Command-R.
When a retimed clip has its Retime controls hidden, a Retime badge appears to the left of that clip’s name in the Timeline. You can reopen the Retime controls whenever you need to make further changes.
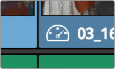
The Speed Effect badge that shows a clip is being retimed
— Select the retimed clip, and either choose Clip > Retime Controls, or press Command-R.
Once you’ve retimed a clip using the Retime effect, you can use that clip’s Retime Process parameter in the Inspector to define how that clip’s retiming is processed, using the low quality Nearest option, using Frame Blending, or using Optical Flow.