< Previous | Contents | Next >
The Subtitle Settings in the Track pane of the Inspector lets you customize parameters for individual subtitle tracks.
Importing Subtitles and Captions
Oftentimes, adding subtitles or closed captions to a DaVinci Resolve timeline will involve importing a subtitle file that’s been prepared elsewhere. Currently, DaVinci Resolve supports subtitle files in multiple formats such as .srt, .vtt, .xml, and .ttml.
1 Open the Media Pool.
![]()
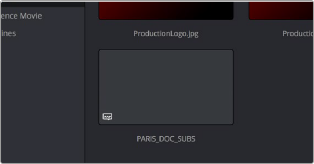
2 Navigate to the folder containing your subtitles. Compatible subtitles will show up as a blank clip icon with a subtitle icon in the lower left corner.
3 Add the subtitle to the Media Pool by dragging, importing via the contextual menu, or any other method identical to adding video clips into the Media Pool.
1 Open the Media Pool.
2 Right-click on any bin in the Bin list, or anywhere in the background of the Media Pool browser, and choose Import Subtitle.
3 In the resulting file dialog, find and select the subtitle file you want to import, and click Open.
4 The subtitle file appears as a subtitle clip in the Media Pool, ready for editing into a subtitle track. A badge indicates that it’s a subtitle clip.

TIP: Subtitle files can be relinked in the Media Pool, just like video clips.
TIP: Subtitle files can be relinked in the Media Pool, just like video clips.
TIP: Subtitle files can be relinked in the Media Pool, just like video clips.
An imported .srt subtitle file
1 To add a subtitle clip to a timeline automatically and match its position via timecode:
— Right click on the subtitle and select “Insert Selected Subtitles to Timeline Using Timecode.”
The subtitle clip will decompose into individual subtitles appearing in the subtitle track, and each subtitle will be aligned with the timeline’s timecode.
2 To add a subtitle clip to a timeline manually if you don’t have matching timecode, do one of the following:
— Drag a subtitle file you’ve imported into the unused gray area at the top of your video tracks, and a subtitle track will automatically be created for adding those subtitles into
— Drag a subtitle file you’ve imported into a pre-existing subtitle track
As you drag the subtitle clip, it’ll immediately be decomposed so that each title is added to the Timeline as an individual subtitle clip, with its timing offset relative to the position of the first frame of the first subtitle in that file.
![]()
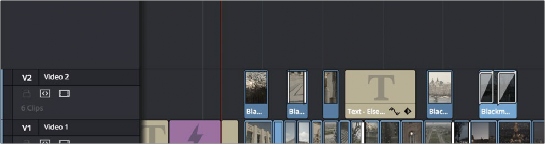
The original Timeline
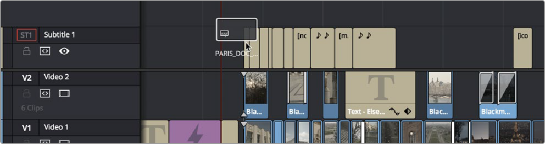
The Timeline after dragging a subtitle file has created a new subtitle track
3 Position the imported subtitles so that they align with the first frame of your program that they’re supposed to, and drop the titles into the track. If you inadvertently misplace the subtitles, don’t worry, you can always select them all and slide them earlier or later, just like any other clips.
4 If you’ve added a new subtitle track, you can rename it to identify what language and country that track corresponds to. Please note that subtitle track names are used when exporting or encoding subtitles, so please make sure your tracks are named appropriately prior to export/delivery.
5 If you want to restyle all of the subtitles you’ve just added, for example to make them smaller or change the font, then click on the header of the subtitle track you’ll be working on, open the Track panel of the Inspector, and select the formatting you want that track to use.