< Previous | Contents | Next >
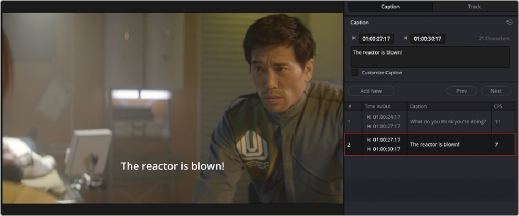
The Create Subtitles from Audio options
Create Subtitles from Audio will then start to transcribe the spoken text, and a dialog box will show you its progress. When it’s finished, the resulting subtitles will be added to the Subtitle track. If there is no Subtitle track on your Timeline, it will automatically make one for you. If there is more than
one subtitle track on your Timeline, Create Subtitles from Audio will always use the highest track to write to.
The one area where the Create Subtitles from Audio tool will still commonly fail is having overlapping dialog clips on multiple tracks. To work around this, you can mute any audio track on the Timeline you don’t want used in the subtitle analysis.
![]()
Once the Create Subtitles from Audio is complete, you can manually edit the captions to fix any minor errors using the tools described above in the Adding Subtitles and Captions Manually section.
Create Subtitles from Audio Language Support
As of this writing, Create Subtitles from Audio supports the following languages:
— Chinese (Simplified Mandarin), Danish, Dutch, English, French, German, Italian, Japanese, Korean, Norwegian, Portuguese, Russian, Spanish, and Swedish.
Editing Subtitles and Captions
Subtitle clips can be selected singly or together, and slipped, slid, resized, rolled, and rippled just like any other clip in the Timeline, using the mouse or using keyboard commands, with either the Selection, Trim, or Razor tools. You can select subtitle clips in their entirety, or just their edit points, in preparation for nudging or dynamic trimming. In short, subtitle clips can be edited, in most ways, just like any other clips.
Styling Subtitles and Captions
When it comes to styling subtitle text, there are a wealth of styling controls in the Track Style panel of the Inspector.
1 Click on the header of the subtitle track you’ll be working on, or select a clip on a particular subtitle track either in the subtitle track or in the subtitle list of the Captions panel in the Inspector.
2 Open the Inspector, and then open the Track panel that appears within.
3 Edit whatever parameters you need to set the default style of all subtitles and closed captions that appear on that track. The Track panel has many more options than the Captions panel, including
a group of Style and Position controls over Font and Font Face, Color, Size, Line Spacing, and Kerning, Alignment, Position X and Y, Zoom X and Y, Opacity, and Text Anchoring.

![]()
Selecting a Font Case in the Track tab of the Subtitle Inspector
Keep in mind that there are additional groups of controls that let you add a Drop Shadow, Stroke, and/or Background to all text on that track, which can be found at the bottom of the Track panel of the Inspector.
You can also modify the look of each subtitle clip individually, even down to changing a single word or letter, regardless of the settings in the Track panel.
1 Select a clip on a particular subtitle track, either in the subtitle track or in the subtitle list of the Captions panel in the Inspector.
2 Select the Customize Caption check box under the Caption.
3 Edit whatever parameters you need to set the style of only this single subtitle. All other titles in the track will remain in the original track style.
1 Select a clip on a particular subtitle track, either in the subtitle track or in the subtitle list of the Captions panel in the Inspector.
2 Select the Customize Caption check box under the Caption.
3 Highlight the text that you want to change in the Caption panel.
4 Edit whatever parameters you need to set the style of the highlighted text on this subtitle. All other titles in the track will remain in the original track style.
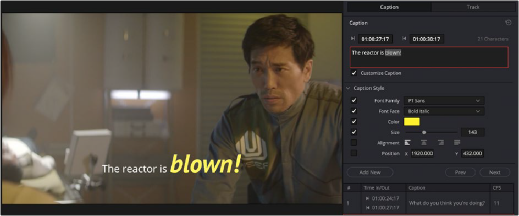
![]()
Checking the Customize Caption box reveals the tools for changing the look of an individual subtitle or text.
Using Subtitle Track Style Presets
If you want to save and re-use a specific subtitle style, you can add it to the Subtitle Style Preset menu, accessed by clicking on the Subtitle option menu (3 dots) in the upper right corner of the Subtitle Inspector. You can also export and import presets to share a subtitle style between systems.
1 Create a subtitle track and adjust its style in terms of fonts, position, colors, etc.
2 Click on the option menu (3 dots) in the upper right corner of the Subtitle Inspector.
3 Select Save Track as Preset from the drop-down menu.
4 Give your preset a new name.
Your subtitle style preset will now appear in the Subtitle Inspector’s option menu.
1 Select an existing subtitle track that you want to change.
2 Click on the option menu (3 dots) in the upper right corner of the Subtitle Inspector.
3 Select the subtitle style preset from the drop-down menu.
4 Select Load Preset from the submenu.
Your subtitle track will instantly be updated to the new style preset. This command is undoable.
1 Load a subtitle style preset from the Subtitle Inspector option menu.
2 Make any changes you need to the style in terms of fonts, position, colors, etc.
3 Click on the option menu (3 dots) in the upper right corner of the Subtitle Inspector.
4 Select the subtitle style preset you wish to update from the drop-down menu.
5 Select Update Preset in the submenu.
6 Select Update from the dialog box.
Your subtitle style preset will replace the existing preset of the same name. There is no undo for this action.
1 Click on the option menu (3 dots) in the upper right corner of the Subtitle Inspector.
2 Select the subtitle style preset you wish to delete from the drop-down menu.
3 Select Delete Preset in the submenu.
4 Select Delete from the dialog box.
The subtitle style preset will be removed from the Subtitle Inspector’s option menu. There is no undo for this action.
![]()
1 Click on the option menu (3 dots) in the upper right corner of the Subtitle Inspector.
2 Select the subtitle style preset you wish to export from the drop-down menu.
3 Select Export Preset in the submenu.
4 Choose the location to save the “.preset” file from the file browser.
5 Press Save.
The subtitle style preset file will be saved to the user’s computer. The file will have the name of the preset with a .preset extension.
1 Click on the option menu (3 dots) in the upper right corner of the Subtitle Inspector.
2 Select Import Preset in the submenu.
3 Choose the location of the “.preset” file from the file browser.
4 Press Open.
The subtitle style preset will be added to the Subtitle Inspector’s option menu.
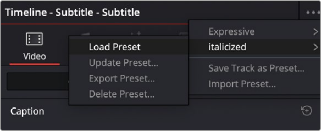
The Subtitle Style Preset menu, found in the option menu of the Subtitle Inspector