< Previous | Contents | Next >
Keyframing Effects in the Edit Page
Most parameters in the Inspector of the Edit page can be keyframed, in order to create animated effects such as zooming in via the Zoom parameter, fading out via the Opacity parameter, or cropping from one side to reveal a clip underneath via the Cropping parameters. Additionally, if you import
a project from an NLE that has keyframed sizing settings, those keyframes will be imported and exposed within the Edit page of DaVinci Resolve.
The primary controls for keyframing are within the Video Inspector. Any parameter that can be keyframed has a gray keyframe button to the right of its slider. If the playhead is on a keyframe, this button turns orange and small navigation arrows appear to its right and left, otherwise it stays gray.
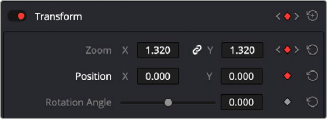
Orange buttons in the Inspector show keyframe usage.
![]()
Zoom shows the playhead parked on the current keyframe with additional keyframes set before and after this one as indicated by the gray navigation arrows. Position shows the playhead parked on the only keyframe set (orange diamond, no arrows), and Rotation Angle shows no keyframe set (gray diamond).
Once you’ve keyframed one or more parameters within a particular group in the Inspector, that clip displays a pair of small buttons at the far right of its name bar in the Timeline, a Curve button and a Keyframe button. Only keyframed clips have these buttons.
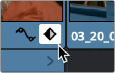
The Keyframe track button in the Timeline appearing on a keyframed clip
— Click the Keyframe button for that clip, at the bottom right corner of the clip.
— Choose Clip > Show Keyframe Editor (Shift-Command-C)
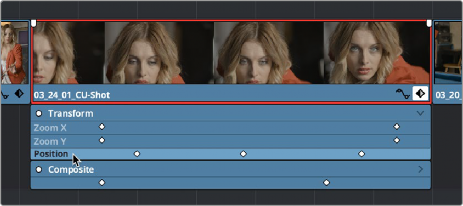
Each group of parameters in the Inspector reveals a single, aggregated keyframe track, that holds all the keyframes of all the parameters within that group, and makes it easy to move, delete, cut, copy, and paste keyframes for each clip. For example, the Pan, Tilt, Zoom, Rotation Angle, and Anchor Point keyframes all appear within the Transform track.

A keyframe track for all of the Transform group parameters
If you want to edit each parameter independently, a small disclosure control at the right of each keyframe track lets you open up an aggregated keyframe track into individual keyframe tracks, one for each parameter that’s been keyframed within that group of Inspector controls.
![]()
Clicking a keyframe track’s disclosure control reveals individual keyframe tracks for each keyframed parameter in the Inspector
Additionally, each keyframed clip has a Curve button that, when clicked, exposes that parameter within a Curve Editor that’s attached to the clip in the Timeline.
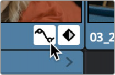
A clip’s Curve button, used to open the Curve Editor for that particular clip
— Click a clip’s Curve button, at the bottom right corner of the clip.
— Choose Clip > Show Curve Editor (Shift-C).
Multiple parameters can be opened within the Curve Editor at the same time, and you can choose which curve to work on by clicking it in the Curve Editor, or clicking one of that parameter’s keyframes in the keyframe track above. Selected control points can be moved, and their Bezier interpolation changed using one of the four buttons located at the top of the Curve Editor.