< Previous | Contents | Next >
The keyframe selection hierarchy in DaVinci Resolve runs through the keyframable options from top to bottom; if no keyframe makes sense in the context of the top entry, it automatically chooses the next one down the list, and so on.
— The Retime Controls (if already active)
— The active effect curve in the Keyframe Editor (if already open)
— The last Inspector control that was manipulated
— Audio Gain
For example, if you previously adjusted the Zoom parameter on a clip, then added a new keyframe to the clip by pressing Option-[ , it would bypass the Retime Controls, the Effect Curves if those controls were closed in the inspector, and add a new Zoom keyframe, as that was the last tool manipulated.
This also means that when you add a keyframe to a basic clip on a timeline with no modifications, it adds an Audio Gain Keyframe.
If you want to do more complex keyframing, or DaVinci Resolve is not picking up on the context correctly, you can use the Keyframe Editor.
The Keyframe Editor
![]()
The Keyframe Editor in the Timeline is the most powerful way of exposing all of a clip’s keyframes and adjusting their timing and interpolation. It’s only available when you’ve already keyframed one of a clip’s Inspector properties.
— Click a clip’s Keyframe button at the far right of a clip’s name bar.
— Select a clip and choose Clip > Show Keyframe Editor (Command-Shift-C).
The Keyframe track button in the Timeline appearing on a keyframed clip
The Keyframe Editor exposes one keyframe track for each group of parameters that’s keyframed. For example, the Composite parameters, Transform parameters, and Cropping parameters are all encapsulated by group tracks. For example, if you’d added keyframes to the Zoom and Position parameters, these keyframes all appear within a single keyframe track labeled Transform, while Opacity adjustments appear on a second keyframe track for Composite.
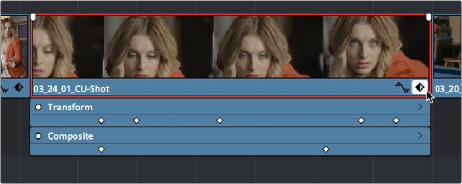
Group keyframe tracks open in the Timeline
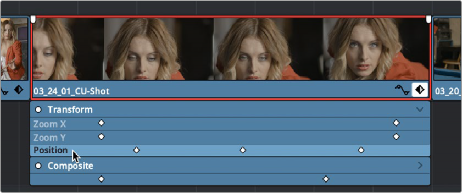
However, each group keyframe track has a disclosure button that lets you show or hide each individual parameter that’s keyframed within that group. For example, clicking the Transform keyframe track’s disclosure button shows the Zoom and Position tracks, so you can adjust those individual keyframes.
![]()
Individual parameter keyframe tracks open in the Timeline
These keyframe tracks let you edit keyframes in context of the actual clip durations in the Timeline. Click the small Keyframe button at the bottom right of the clip’s name bar to close the keyframe tracks when you’re finished.
— To add new keyframes to the Keyframe Editor: Press Command-[ or Option-click anywhere on a track of the Keyframe Editor to add a new keyframe, which defaults to whatever the current value is for that parameter at that frame. New keyframes create linear animated changes by default.
— To duplicate one or more keyframes: Make a selection of keyframes, then hold the Option key down and drag the selected keyframes to duplicate them and move the duplicates
to a new position.
— To select a single keyframe: Click a single keyframe to select it.
— To select multiple discontiguous keyframes: Command-click all keyframes you want to select, whether they’re next to one another or not.
— To select multiple contiguous keyframes: Click the first keyframe you want to select, and then shift-click the last keyframe you want to select, and all keyframes between will also be selected, or drag a bounding box within the keyframe track around multiple keyframes to select them all at once.