< Previous | Contents | Next >
— To change one or more Linear keyframe to Ease In or Ease Out: Eased keyframes create animated changes that begin slowly and accelerate to full speed, or slow down gradually to decelerate to a stop. This only works when you have two or more keyframes creating an animated effect. Select one or more keyframes, then right-click one of the selected keyframes and choose Ease In, Ease Out, or Ease In and Out, depending on which keyframe you’re editing and the effect you want to create.
— To change one or more eased keyframes to Linear: Select one or more keyframes, then right- click one of the selected keyframes and choose Linear.
— To move one or more keyframes: Select one or more keyframes and drag left or right. While you drag keyframes, a tooltip appears showing you the offset in frames of your adjustment from the beginning of that clip’s source media. If you’re only dragging one keyframe, the tooltip also shows you the name of the parameter you’re modifying.
— To nudge selected keyframes one frame at a time: Select one or more keyframes and press Command-Left Arrow or Command-Right Arrow to nudge them back and forth, for precision editing. The Curve Editor must also be open.
![]()
— To cut or copy, and paste one or more keyframes: Make a selection of keyframes, and use the Cut (Command-X) or Copy (Command-C) key shortcuts. Then, move the playhead to where you want the first of the copied keyframes to start, and press Paste (Command-V). The Curve Editor must also be open.
— To delete one or more control points from a curve: Select the keyframe(s) you want to delete and press Backspace, or press Option-]. The Curve Editor must also be open.
The Curve Editor
If you want to work with keyframes in even more detail, you can use the Curve Editor. The Curve Editor can be opened in addition to the Keyframe Editor, or it can be opened in isolation. When clicked, the Timeline expands to accommodate a large space under an animated clip in which you can freely adjust both the timing and value of selected keyframes, while also providing optional bezier spline controls used to create smooth curves with which to adjust the acceleration of animated changes from one value to another.
— Click a clip’s Curve button at the far right of a clip’s name bar.
— Select a clip and choose Clip > Show Curve Editor (Shift-C).
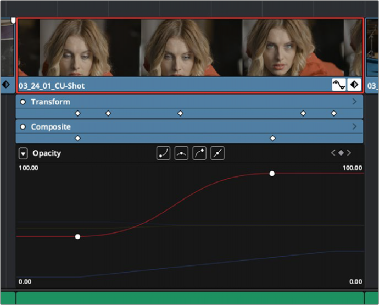
The Curve Editor open in the Timeline
![]()
You can open multiple parameters into the Curve Editor using the curve pop-up menu at the upper left-hand corner of the Curve Editor that lets you choose which parameters are exposed via checkboxes. This menu also lets you choose which curve is selected by clicking the name of the parameter you want to edit.
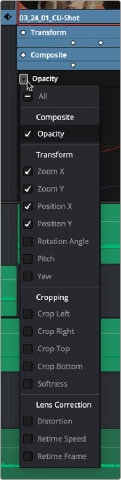
Choosing which parameters to display in the Curve Editor
While you can only work on one curve at a time, you can choose which is selected for editing by either selecting it in this pop-up menu or by clicking any dimmed curve in the Curve Editor. Using the control points exposed by each curve, you can edit parameters, alter keyframe timing, and change each control point’s interpolation to create custom easing effects affecting the acceleration of change from one keyframe to the next.
— To change which curve you’re editing: If the Keyframe Editor is open at the same time as the Curve Editor, you can click the keyframe track you want to edit and the corresponding curve will be highlighted. Otherwise, click the Curve menu at the upper left-hand corner of the Curve
Editor, and choose which curves you want to expose to work on. If multiple curves are open in the Curve Editor, click any dimmed curve in the background to highlight it for editing. If the clip you’re editing is too narrow, then the Curve menu may be hidden; zooming into the Timeline will show the Curve menu again.
— To add new keyframes to a curve: Option-click anywhere on a curve to add a new control point.
— To duplicate one or more keyframes: Make a selection of keyframes, then hold the Option key down and drag the selected keyframes to duplicate them and move the duplicates to a new position (and even new values). This can be a good way to quickly loop a repetitive animated effect you’ve created.
— To select a single keyframe: Click a single keyframe to select it.
![]()
— To select multiple discontiguous keyframes: Command-click all keyframes you want to select, whether they’re next to one another or not.
— To select multiple contiguous keyframes: Click the first keyframe you want to select, and then shift-click the last keyframe you want to select, and all keyframes between will also be selected, or drag a bounding box within the Curve Editor around multiple keyframes to select them all at once.
— To select all keyframes: If the Keyframe Editor is open and it has focus (by clicking anywhere within it), then pressing Command-A will select all keyframes within that Keyframe Editor.
— To drag one or more keyframes freely on a curve: Select one or more keyframes and drag left or right to retime them, and up or down to change their value.
— To drag one or more keyframes on a curve in only one direction: Select one or more keyframes, then hold the Shift key while dragging either vertically or horizontally to constrain keyframe adjustment within that single direction.
— To nudge selected keyframes one value or frame at a time: Select one or more keyframes and Command-Left Arrow and Command-Right Arrow to nudge them in time, or Command-Up Arrow and Command-Down Arrow to nudge their value, for precision keyframe adjustments.
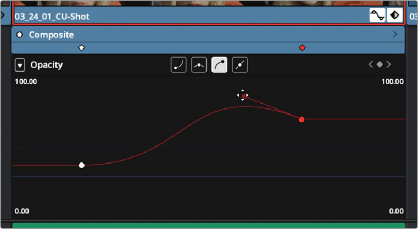
— To change the interpolation of a single keyframe: There are two methods. You can select the keyframes you want to change, and then click one of the four Bezier interpolation buttons in the Curve Editor title bar. Or, you can right-click one of the selected keyframes and choose one of the interpolation options from the contextual menu. Keyframes that have already been eased in the Keyframe Editor or via controls in the Inspector already have bezier handles exposed in the Curve Editor.
— To change the interpolation of multiple keyframes: Select multiple keyframes by Command- clicking or dragging a bounding box, and then click one of the four Bezier interpolation buttons in the Curve Editor title bar to simultaneously change the interpolation of all of them.
— To adjust a Bezier handle: Drag the Bezier handle in any direction to alter the curve.
![]()
The Curve Editor with Bezier interpolated keyframes
— To cut or copy, and paste one or more keyframes: Make a selection of keyframes and use the Cut (Command-X) or Copy (Command-C) key shortcuts. Then, move the playhead to where you want the first of the copied keyframes to start, and press Paste (Command-V).

IMPORTANT: Keyframes on the Timeline can exist past a clip’s current extents. For example, if you set several keyframes on a clip, then trim its duration on the Timeline past one of the keyframes, that keyframe is still there and fully functional, just not visible. You can still navigate to these invisible keyframes by using the Previous “[“ and Next “]” keyframe commands or using the keyframe controls in the Inspector.
IMPORTANT: Keyframes on the Timeline can exist past a clip’s current extents. For example, if you set several keyframes on a clip, then trim its duration on the Timeline past one of the keyframes, that keyframe is still there and fully functional, just not visible. You can still navigate to these invisible keyframes by using the Previous “[“ and Next “]” keyframe commands or using the keyframe controls in the Inspector.
IMPORTANT: Keyframes on the Timeline can exist past a clip’s current extents. For example, if you set several keyframes on a clip, then trim its duration on the Timeline past one of the keyframes, that keyframe is still there and fully functional, just not visible. You can still navigate to these invisible keyframes by using the Previous “[“ and Next “]” keyframe commands or using the keyframe controls in the Inspector.
— To delete one or more control points from a curve: Select the keyframe(s) you want to delete and press Backspace.