< Previous | Contents | Next >
Sending one or more clips to the standalone version of Blackmagic Fusion is simple.
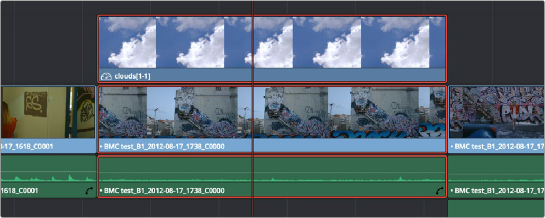
1 Select one or more clips in the Timeline that you want to send to Fusion. In this example, two superimposed clips are selected.
Selecting two clips to send to Fusion
![]()
2 Right-click one of the selected clips and choose New VFX Connect Clip from the contextual menu.
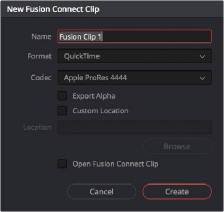
The New VFX Connect Clip dialog
3 In the New VFX Connect Clip dialog, choose the following options:
a) Enter a name.
b) Choose a video format (for rendering media to send to Fusion).
c) Choose a codec, based on the format you selected.
d) If you want to send Alpha channels to Fusion, turn the Export Alpha checkbox on. This exports alpha channels that are embedded in a clip, as well as alpha channels that are being created in DaVinci Resolve.
e) If you want to save the VFX Connect Clip that you’re creating, along with its directory and media, to a specific location, turn on the Custom Location checkbox, then click the Browse button and choose a location. Otherwise, the directory containing the VFX Connect clip and any source media rendered along with it is placed in the same directory as the scratch disk.
f) If you want to immediately open Fusion, turn on the “Open VFX Connect Clip” checkbox.
If you do this, then DaVinci Resolve by default renders each of the video clips you selected, along with every speed effect, transform, and Color page operation that’s been applied
to each clip, using the Timeline Color Space. However, if you click Cancel when the Render Composition Media dialog appears, then the Fusion project that opens references the source media on disk, rather than rendered media that’s generated by DaVinci Resolve.
4 When you’re finished, click Create. DaVinci Resolve creates a VFX Connect clip, which appears in the Timeline as a single clip and in the Media Pool.
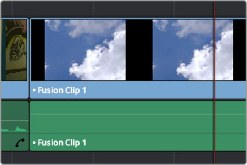
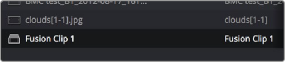
(Left) VFX Connect clips in the Timeline, (Right) in the Media Pool
5 Opening the VFX Connect clip in Fusion can be done in one of two ways:
![]()
— If you turned on “Open VFX Connect Clip,” then Fusion automatically opens and the clips you selected appear as Loader nodes within Fusion.
— If you didn’t, then you can right-click the VFX Connect clip in the Media Pool, and choose VFX Connect > Open Fusion from the contextual menu.
At this point, new media is rendered (by default), Fusion opens, and the clips you sent are converted into a Fusion node tree, explained in greater detail in the following section.
6 In Fusion, use the available tools to create the required effect.
7 Optionally, before you render, if you want to change the Output Format, click the Output node, and choose a new format from the Output Format pop-up in the Tools tab. If you don’t do this, the Fusion composite will be rendered using the format you selected when you sent the VFX Connect clip in the first place.
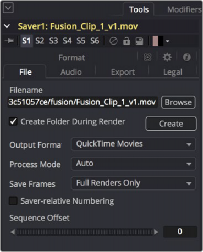
The Tools panel where you can change the file information governing the rendered output