< Previous | Contents | Next >
1 Select one or more offline clips to relink, or select a bin in the Media Pool bin list that contains clips you want to relink, then right-click one of the selected clips or the selected bin, and choose “Relink Selected Clips” from the contextual menu.
2 When the Relink File dialog opens, choose a directory in which to look for the files you want to relink to, and click OK. DaVinci Resolve attempts to find every clip with a matching file name in the subdirectories of the directory you chose, using the original file paths of the clips being relinked to do this as quickly as possible. By first looking for the clips in the directories they were originally in, relinking can be quite fast.
3 If there are any clips that couldn’t be found using the method in step 2, you’re prompted with the option to do a “deep search” by a second dialog. If you click Yes, then DaVinci Resolve will look for each clip inside every subdirectory of the directory you selected in step 2. This may take significantly longer, but should be completely successful so long as the media that’s required is within the selected directory structure.
4 If there are still other clips that couldn’t be found, you’re prompted to either choose another directory altogether to continue searching, or quit.
![]()
Using “Change Source Folder” to Relink Clips
If you’ve used your file system to move media that’s associated with a DaVinci Resolve project, but you haven’t changed the directory structure with which it’s organized, you can use the “Change Source Folder” command to quickly relink selected clips in the Media Pool to the new file path of the media on disk, using the original file paths as a guide. This is a good relinking method to use, if possible, for projects on a SAN where you don’t want to risk the excessively long search times that could result from using the Relink command to examine a nested hierarchy of folders in a more flexible way.
1 Select one or more clips in the Media Pool, then right-click one of the selected clips, and choose “Change Source Folder” from the contextual menu. The Relink Media window appears displaying the original path for the material, with controls for choosing a new directory.
2 Click the “Browse” button to the right of the “Change To” field, and then use the file navigation dialog to find the new location of the media file, select it, and click Open.
3 If you succeeded in finding the appropriate media file, click Change. Otherwise, click Cancel.
Using the “Reconform From Bins” Command
The “Reconform From Bins” command gives you a way of reconforming multiple clips in a timeline at once to a specific bin (or bins) of clips with matching metadata. To use this command, you must first select the clips you want to reconform in a timeline (you can choose all of them or just a subset) and turn off Conform Lock Enabled, and then, using the Reconform From Bin command, you can manually choose another bin of clips in the Media Pool that you want to reconform to.
An important aspect of the Reconform From Bins command is that DaVinci Resolve only reconforms timeline clips that can be matched to source clips in selected Media Pool bins. All timeline clips
that cannot be matched are left alone. This makes Reconform From Bins an ideal command to use when you’ve imported a subset of clips to the Media Pool that you need to reconform to clips found throughout an existing timeline.
For example, you could use this method to:
— Replace transcoded versions of clips in a timeline with the original camera raw clips.
— Replace the previous versions of VFX clips in a timeline with new versions.
— Replace the offline-quality media you’ve been working with so far with online-quality media.
— Replace the temp clips you were originally given with rescanned or recaptured stock footage.
To use Reconform From Bins, it’s important to organize the clips you’re adding to the Media Pool sensibly, in a self-contained bin or bins separate from the other media used by that timeline. It can be a sub-bin, but it must be separate.
Here’s a simple example. If the media you edited or originally imported is in Bin 1, then import the updated versions of all clips that need to be reconformed into Bin 2. Using Reconform From Bins, you can then decide whether the clips in your timeline should be conformed to Bin 1, or Bin 2 when possible, because only timeline clips for which there is a valid match are reconformed, while all other timeline clips are ignored.
![]()
DaVinci Resolve has the ability to choose custom conform options to control what metadata is used to match timeline clips to source clips in the Media Pool. This means that you’re not restricted to only using Timecode, Reel Name, and File Name, you could also use any combination of Total Duration,
Resolution, Bit Depth, Frame Rate, File Format, Codec, and/or Media UMID/UID to control how clips are conformed, depending on your needs and the problem you have to solve.
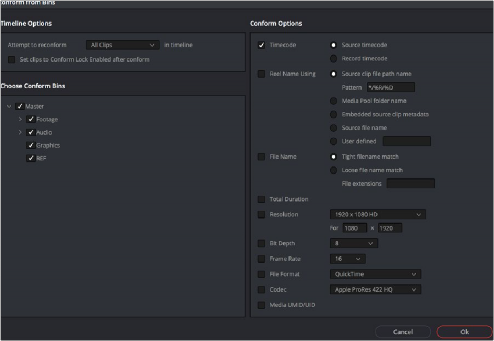
The Reconform from Bins dialog
However, if the criteria you’ve selected to control the conform doesn’t match, the Reconform From Bins operation will fail, and you’ll need to either try again with other conform criteria, or manually replace the necessary clips in the Timeline.
Here’s a step by step workflow.
1 Double-click the Timeline you want to reconform to open it.
2 Either select the specific clips you want to reconform, or press Command-A to select every clip in the Timeline if you want to reconform clips throughout the entire timeline without having to make individual selections.
3 Right-click one of the selected clips, and choose “Conform Lock Enabled” to disable Conform Lock Enabled for the clips you want to reconform. This frees DaVinci Resolve to consider all possible conform matches for those clips in cases where there may be multiple clips with overlapping timecode in the Media Pool.
4 Right-click the current Timeline in the Media Pool, and choose Timelines > Reconform From Bins. The Conform Options dialog appears, with Timeline Options and Choose Conform Bins list to the left, and the Conform Options panel to the right.
![]()
5 From the Timeline Options section, choose whether you want to conform to All Clips or just to Selected Clips. Then, choose whether you want to “Set clips to Conform Lock Enabled” after conform.
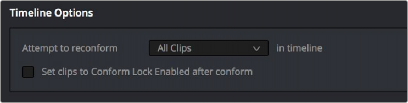
Choosing which clips in the Timeline to attempt to reconform
6 In the Choose Conform Bins section, click the disclosure triangle to the left of the Master bin to reveal the sub-bins contained within.
7 Turn on the checkboxes for the bins with media you want to conform the Timeline to, and turn off the checkboxes for bins with media that you want to ignore.
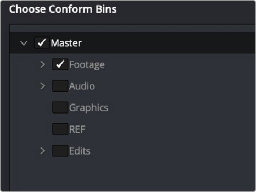
Selecting folders for reconform
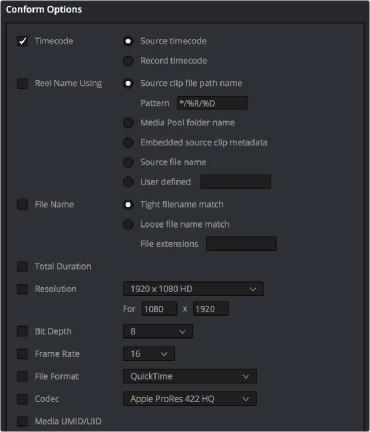
8 Next, choose the conform options you want to be considered when matching timeline clips to Media Pool clips in the selected bins. By default, Timecode is enabled. Choose additional criteria to be even more selective about how you want clips to be reconformed, or choose
different criteria if you need to use other metadata to get better results for clips you’re having a hard time conforming.
![]()
Selecting criteria to guide the reconform

TIP: Choosing Custom from the top of the pop-up menu for File Extensions, File Format, and Codec displays editable fields into which you can enter multiple options, separated by commas, in order to list multiple possibilities for a successful match. The order in which you enter these is important, as DaVinci Resolve will attempt to conform clips starting with the first format/codec at the left, moving to try the next format/ codec to the right if no match is found, until every entry in your list has been tried.
TIP: Choosing Custom from the top of the pop-up menu for File Extensions, File Format, and Codec displays editable fields into which you can enter multiple options, separated by commas, in order to list multiple possibilities for a successful match. The order in which you enter these is important, as DaVinci Resolve will attempt to conform clips starting with the first format/codec at the left, moving to try the next format/ codec to the right if no match is found, until every entry in your list has been tried.
TIP: Choosing Custom from the top of the pop-up menu for File Extensions, File Format, and Codec displays editable fields into which you can enter multiple options, separated by commas, in order to list multiple possibilities for a successful match. The order in which you enter these is important, as DaVinci Resolve will attempt to conform clips starting with the first format/codec at the left, moving to try the next format/ codec to the right if no match is found, until every entry in your list has been tried.
9 Click OK. Where possible, the Timeline is automatically updated to conform to the media contained within the bins you checked.
10 After you’ve used “Reconform From Bins,” any timeline clips that have been reconformed and that now have timecode and reel names/file names that match two or more source clips in the
Media Pool will display a clip conflict badge in the Timeline. To eliminate this badge, you can select either just the clips that were conformed, or all clips in the Timeline, right-click them, and choose Conform Lock Enabled to eliminate these warnings.