< Previous | Contents | Next >
Using Reconform From Media Storage
DaVinci Resolve 14 introduces another reconform method, that lets you conform clips in a timeline to clips in a specific File System directory (including all subdirectories) using the “Reconform From Media Storage Folders” command. This allows you to reconform multiple clips in a timeline, all at once, to matching source media files on disk without having to import those clips to the Media Pool first; all clips that can be conformed according to the specified conform criteria will be automatically imported as necessary.
An important aspect of the Reconform From Media Storage command is that DaVinci Resolve will reconform all timeline clips that can be matched to source media files on disk in the selected Media Storage directories, but all Timeline clips that cannot be matched are left alone. This makes Reconform From Media Storage an ideal command to use in the following situations:
— When you need to reconform clips that are found throughout an existing timeline to a smaller subset of media in a specific directory on disk, such as updated VFX or Motion Graphics from a third-party application.
![]()
— When you need to quickly reconform missing timeline clips throughout an imported timeline, and especially when you need to use custom conform criteria to successfully reconform those clips. (Unlinked clips can only be reconformed with this command if you select them and turn off Conform Lock Enabled first.)
Similar to the Reconform From Bins command, you can specify exactly what combination of conform criteria you want to use to match clips in the timeline with clips in the Media Pool. This means that you’re not restricted to only using Timecode, Reel Name, and File Name, you could also use any combination of Total Duration, Resolution, Bit Depth, Frame Rate, File Format, Codec, and/or Media UMID/UID to control how clips are conformed, depending on your needs and the problem you
have to solve.
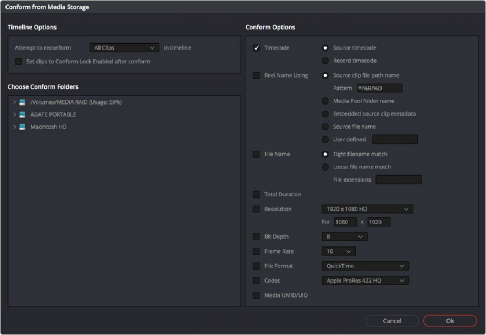
The Reconform From Media Storage dialog
This method of timeline conform is ideal when the only way you can conform a timeline to the media you require is using a very specific combination of metadata that’s different from the rules that DaVinci Resolve defaults to.
For example, you have a jumbled mix of 8- and 10-bit versions of the same clips on your hard drive, but you only want to conform a given timeline to the 10-bit media in preparation for finishing. Using “Reconform from media storage folders” lets you be this specific with what media to use.
1 Double-click the Timeline you want to reconform to open it.
2 Either select the specific clips you want to reconform, or press Command-A to select every clip in the Timeline if you want to reconform clips throughout the entire timeline without having to make individual selections.
3 Right-click one of the selected clips, and choose “Conform Lock Enabled” to disable Conform Lock Enabled for the clips you want to reconform. This frees DaVinci Resolve to consider all possible conform matches for those clips in cases where there may be multiple clips with overlapping timecode in the Media Pool.
4 Right-click the timeline you want to reconform, and choose Timelines > Reconform from media storage folders. The Import From dialog appears, with a File System browser to the left, and an Options panel to the right.
![]()
5 From the Timeline Options section, choose whether you want to conform to All Clips or just to Selected Clips. Then, choose whether you want to “Set clips to Conform Lock Enabled” after conform.
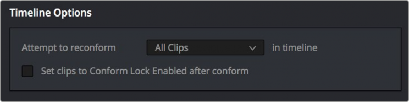
Choosing which clips in the Timeline to attempt to reconform
6 From the Conform Folders section, choose a directory that contains media you want to reconform to.
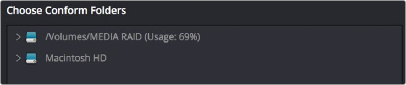
Selecting a directory that has media you want to conform to
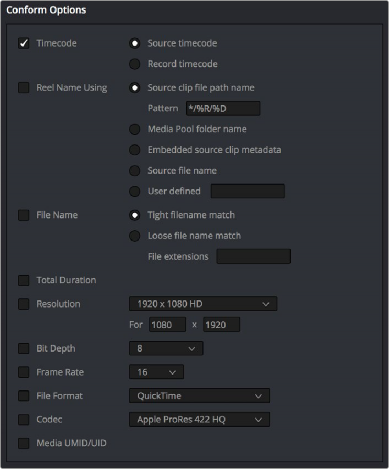
7 Next, choose the conform options you want to be considered when matching timeline clips to source media files in the selected directory. By default, Timecode is enabled. Choose additional criteria to be even more selective about which clips will be reconformed, or choose different criteria if you need to use other metadata to get better results.

TIP: Choosing Custom from the top of the pop-up menu for File Extensions, File Format, and Codec displays editable fields into which you can enter multiple options, separated by commas, in order to list multiple possibilities for a successful match. The order in which you enter these is important, as DaVinci Resolve will attempt to conform clips starting with the first format/codec at the left, moving to try the next format/codec to the right if no match is found, until every entry in your list has been tried.
TIP: Choosing Custom from the top of the pop-up menu for File Extensions, File Format, and Codec displays editable fields into which you can enter multiple options, separated by commas, in order to list multiple possibilities for a successful match. The order in which you enter these is important, as DaVinci Resolve will attempt to conform clips starting with the first format/codec at the left, moving to try the next format/codec to the right if no match is found, until every entry in your list has been tried.
TIP: Choosing Custom from the top of the pop-up menu for File Extensions, File Format, and Codec displays editable fields into which you can enter multiple options, separated by commas, in order to list multiple possibilities for a successful match. The order in which you enter these is important, as DaVinci Resolve will attempt to conform clips starting with the first format/codec at the left, moving to try the next format/codec to the right if no match is found, until every entry in your list has been tried.
![]()
Selecting criteria to guide the reconform
8 Click OK. Where possible, the Timeline is automatically updated to conform to the media in the directory you selected, and all source media files that were conformed have been imported into the Media Pool.
9 After you’ve used “Reconform From Media Storage Folders,” any timeline clips that have been reconformed and that now have timecode and reel names/file names that match two or more source clips in the Media Pool will display a clip conflict badge in the Timeline. To eliminate this badge, you can select either just the clips that were conformed, or all clips in the Timeline, right- click them, and choose Conform Lock Enabled to eliminate these warnings.