< Previous | Contents | Next >
— If Media Composer and DaVinci Resolve are on the same system: Choose “Link to (Don’t Export) Media” to export an AAF file that links to the existing media in its current location. Click the Audio Details tab and choose “Link to (Don’t Export) Media” from the Export Method pop-up menu.
— If Media Composer and DaVinci Resolve are on different systems: Choose one of the two following export methods:
— Copy All Media: For each source clip used, the entire corresponding media file is copied. This can be useful when you want to preserve the original relationship of each clip to the source media file it came from. However, be aware that you’ll potentially be exporting a lot of media when you use this option.
— Consolidate Media: This is a more efficient media management workflow for finished projects, since unused media will not be copied. You can specify additional handles to add to the beginning and end of each exported media file, in frames, in the Handle Length field. Should any media file and its handles overlap another media file and its handles, both will be combined into a single exported media file.
7 (Optional) If you’re using a combination of media in your project that includes formats that aren’t compatible with DaVinci Resolve, you can optionally turn on the “Transcode Video To” checkbox and choose a media format from the pop-up menu to the right. This option automatically transcodes all media in your sequence that doesn’t match the format specified in the pop-up to match that format.
![]()
8 If you’re copying or consolidating media to another drive, choose “Folder” from the Media Destinations Video/Data pop-up menu. Turn on the “Use Same Folder As AAF File” checkbox to save the exported media to the same folder you selected in step 3. If you leave this checkbox turned off, you can click Select Folder to choose another location.
9 Click Save, and when you return to the Export As dialog, click Save again.
Once export is complete, you’ll see a duplicate sequence and duplicate media populating your Media Composer bin, with the suffix “.Exported” appended to the sequence, and “.new” appended to each media clip. In the file system, the resulting folder contains an AAF file, and an Avid MediaFiles folder that contains the exported media.
Step 3–Conforming Your AAF in DaVinci Resolve
1 Open DaVinci Resolve and create a new project.
2 Before you do anything else, you need to set DaVinci Resolve to properly read the timecode and reel number information from the AAF files that Media Composer creates. Click the gear button at the lower right-hand side of the DaVinci Resolve window to open the Project Settings window, click General Options to reveal the Conform Options, and do the following:
— Make sure that “Use Timecode” is set to “Embedded in the source clip.”
— Turn the “Assist using reel names from the” checkbox on, and choose “Embedding in source clip file.”
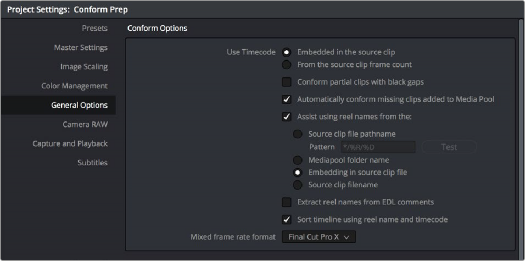
Conform assistance with reel names embedded in the source clip
3 Click Save.
4 Do one of the following:
— From any page, choose File > Import AAF, EDL, XML (Shift-Command-I).
— Open the Edit page, right-click anywhere in the Media Pool, and choose Timelines > Import > AAF/EDL/XML.
![]()
5 When the File Selection window opens, select the AAF file you exported from Media Composer, and click Open.
6 When the Load AAF dialog appears, the settings you choose determine which media files the AAF will be conformed to:
Load AAF window conform options
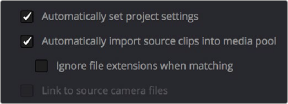
— To conform to the transcoded or AMA-linked media files you edited: Leave the “Automatically import source clips into media pool” checkbox turned on.
— To conform to a different set of camera original media files: Turn on both the “Automatically import source clips into media pool” and “Link to source camera files” checkboxes, which references the Source Name metadata that Media Composer/Symphony embeds in exported AAF files to track the correspondence in file naming between transcoded and camera original media.
— To conform to a directory of media of your choosing: Turn on both the “Automatically import source clips into media pool” and “Ignore file extensions when matching” checkboxes.
— To conform to media that’s already in the Media Pool: Turn off the “Automatically import source clips into media pool” checkbox. There must be clips in the Media Pool for this to work.
7 Additionally, make sure that the “Automatically set project settings” checkbox is on.