< Previous | Contents | Next >
8 There are three other options that are relevant to AAF import:
Load AAF window conform options
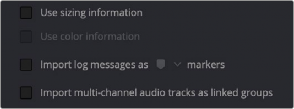
— Use Sizing Information: (Optional) Use this checkbox if you want to import position, scale, and rotate transform data from the originating Media Composer project into DaVinci Resolve.
— Import log messages as COLOR markers: Turn on this checkbox and choose a color from the accompanying drop-down menu for markers that will be placed in the Timeline with note text describing import errors that you might want to troubleshoot later.
— Import multi-channel audio tracks as linked groups: Turn on this checkbox if you want to import multi-channel audio, such as stereo, 5.1, and 7.1 audio into individual mono timeline tracks that are linked together in the Fairlight page. For more information about Linked Groups, see Chapter 167, “Setting Up Tracks, Busses, and Patching.” If this checkbox is turned off, multi-channel audio will be imported into multi-channel audio tracks in the Timeline.
9 Click OK.
![]()
As long as the media remains where it was when you exported it from Media Composer, the timeline and all its media should now import. However, if the location of the media files you’re conforming
to has changed, then you may need to identify the location of the media via an additional dialog.
For example, if you’ve copied the media from the portable hard drive it was originally conformed to, to a faster storage volume, then a file dialog appears, requesting that you choose the folder containing the media used by your project. If prompted, do so and click OK.
Once import is complete, the Media Pool fills with the source media used by the imported project, and the edit appears as the current Timeline in the Edit page.
Step 4–Continue Editing, Grading, and Finishing the Project
Edit the Timeline in the Edit page and grade each clip in the Color page as you would any other. However, you should be aware that if you use the tools found in the Edit page to make any editorial changes to the timeline you’ve imported, your export options will change later on:
— If you don’t make editing changes: Then you have the option to have DaVinci Resolve use the Avid AAF file that you originally imported to generate an updated one. This preserves audio and all other unsupported effects from the original AAF file, so that they reappear when you export a new AAF back to Media Composer. If you use this option, you need to make sure the original AAF file you import remains in the same location.
— If you do make editing changes: Then you need to use the “Generate New AAF” command to export an AAF of the re-edited Timeline from DaVinci Resolve back to Media Composer. This newly generated AAF file will not include any effects that are not supported by DaVinci Resolve.