
< Previous | Contents | Next >
Each effect node also appears as a layer, just like clips. You can resize the In and Out points of an effect layer, and slide the entire layer forward or backward in time, just like a Loader or MediaIn layers. If you trim an effect layer to be shorter than the duration of the composition, the effect cuts in at whichever frame the layer begins, and cuts out after the last frame of that layer, just like a clip on
a timeline.
Adjusting Keyframe Timings
When you’ve animated an effect by adding keyframes to a parameter in the Inspector, the Keyframes Editor is used to edit the timing of keyframes easily. By default, all keyframes applied to parameters within a particular node’s layer appear superimposed in one flat track over the top of that layer.
To edit keyframes, you can click the disclosure control to the left of any animated layer’s name in the track header, which opens up keyframe tracks for every keyframed parameter within that layer.
Keyframe tracks exposed
Keyframe Editing Essentials
Here’s a short list of keyframe editing methods that will get you started.
— You can click on a single keyframe to select it.
— You can drag a bounding box over a series of keyframes to select them all.
![]()
— You can drag keyframes left and right to reposition them in time.
— You can right-click one or more selected keyframes and use commands from the drop-down menu to change keyframe interpolation, copy/paste keyframes, or even create new keyframes.
— You can Command-drag one or more selected keyframes to drag a duplicate of them to another position in the keyframe track.
— Select a keyframe, and then enter a new frame number in the Time Edit box.
— Choose T Offset from the Time Editor pop-up, select one or more keyframes, and enter a frame offset.
— Choose T Scale from the Time Editor pop-up, select one or more keyframes, and enter a multiplier added to the current playhead frame position. For instance, if the playhead is on frame 10 and
the keyframe is on frame 30, entering the TScale value of 2 will position the keyframe on frame
50. The distance between the playhead and original keyframe is 20, so (20 x 2) = 40, which is then added to the playhead position.
Time Stretching Keyframes
If you select a range of keyframes in a keyframe track, you can turn on the Time Stretch tool to show a box used to squeeze and stretch the entire range of keyframes relative to one another. The Time Stretcher changes the overall timing of a sequence of keyframes without losing the relative timing from one keyframe to the next. Alternatively, you can turn on Time Stretch and draw a bounding box
around the keyframes you want to adjust to create a time-stretching boundary that way. Click the Time Stretch tool again to turn it off.

Time stretching keyframes
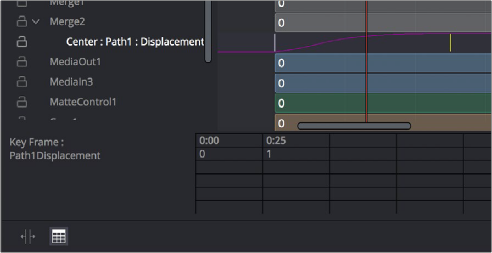
The Keyframe Spreadsheet
If you turn on the Spreadsheet and then click on the name of a layer in the keyframe track, the numeric time position and value (or values if it’s a multi-dimensional parameter) of each keyframe appear as entries in the cells of the Spreadsheet. Each column represents one keyframe, while each row represents a single aspect of each keyframe.
![]()
Editing keyframes in the Spreadsheet
For example, if you’re animating a motion path, then the “Key Frame” row shows the frame each keyframe is positioned at, and the “Path1Displacement” row shows the position along the path at each keyframe. If you change the Key Frame value of any keyframe, you’ll move that keyframe to a new frame of the Timeline.