
< Previous | Contents | Next >
Once you’ve finished, simply go back to the Edit or Cut page and continue editing, because the entire Fusion composition is encapsulated within that clip, similarly to how grades in the Color page are also encapsulated within a clip. However you slip, slide, ripple, roll, or resize that clip, the Fusion
TIP: While you’ll likely want to do all the compositing for a greenscreen style effect in the Fusion page, it’s also possible to add a keyer, such as the excellent DeltaKeyer node, between the MediaIn and MediaOut nodes, all by itself. When you pull a key this way, the alpha channel is added to the MediaOut node, so your clip on the Edit page has
transparency, letting you add a background clip on a lower track of your Edit page Timeline.
effects you’ve created and the Color page grades you’ve made follow that clip’s journey through your edited Timeline.
How Nodes Are Named
While the documentation refers to nodes by their regular name, such as “MediaIn,” the actual names of nodes in the Fusion Node Editor have a number appended to them, to indicate which node is which when you have multiple instances of a particular type of node.
Turning One or More Clips into Fusion Clips
![]()
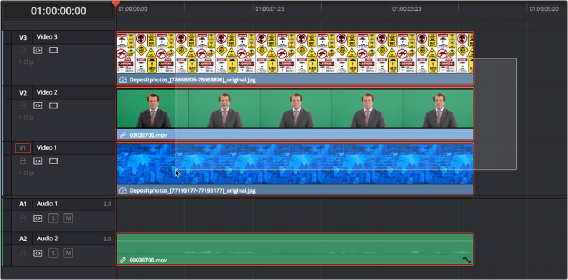
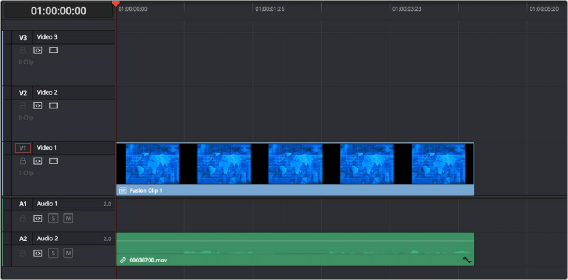
For situations where you know you’re creating a more ambitious composited effect that requires multiple layers edited together with very specific timings, you can create a “Fusion clip” right from the Timeline. For example, if you have a foreground greenscreen clip, a background clip, and an additional graphic clip, you can stack them all on the Timeline as superimposed clips. You can then use the Edit page slip and slide features to align their timings so they work together as necessary. You can also edit multiple consecutive clips together that you want to use in a composition as a series of clips. Once that’s done, you can select every clip in the stack to create a Fusion clip, so you can easily use all these superimposed layers within a Fusion composite.
1 Edit all the clips you want to use in the Edit page Timeline.
2 Select all clips you want to be in the same composite at once.
3 Right-click one of the selected clips and choose New Fusion Clip from the contextual menu.
4 A new clip, named “Fusion Clip X” (where X is an automatically incrementing number) appears in the currently selected bin of the Media Pool and in the Timeline to replace the previously selected clips.
5 With the playhead parked over that clip, open the Fusion page to see the new arrangement of those clips in the Fusion page Node Editor.
![]()
A stack of clips to use in a composite (Top), and turning that stack into a Fusion clip in the Edit page (Bottom).
The nice thing about creating a Fusion clip is that every superimposed clip in a stack is automatically connected into a cascading series of Merge nodes that create the desired arrangement of clips. Note that whatever clips were in the bottom of the stack in the Edit page appear at the top of the Node Editor in the Fusion page, but the arrangement of background and foreground input connections is appropriate to recreate the same compositional order.
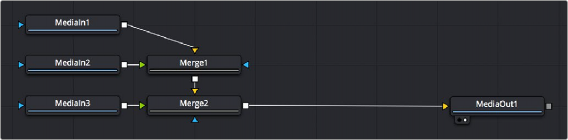
The initial node tree of the three clips we turned into a Fusion clip.

TIP: Fusion clips change the working resolution of the individual clips to match the Timeline resolution. For instance, if two 4K clips are stacked one on top of the other in an HD Timeline, creating a Fusion clip resizes the clips to HD. The full resolution of the individual 4K clips is not available in Fusion. To maintain the full resolution of course clips, bring only one clip into the Fusion composition from the Edit or Cut page Timeline, and then bring other clips into the Fusion composition using the Media Pool.
TIP: Fusion clips change the working resolution of the individual clips to match the Timeline resolution. For instance, if two 4K clips are stacked one on top of the other in an HD Timeline, creating a Fusion clip resizes the clips to HD. The full resolution of the individual 4K clips is not available in Fusion. To maintain the full resolution of course clips, bring only one clip into the Fusion composition from the Edit or Cut page Timeline, and then bring other clips into the Fusion composition using the Media Pool.
TIP: Fusion clips change the working resolution of the individual clips to match the Timeline resolution. For instance, if two 4K clips are stacked one on top of the other in an HD Timeline, creating a Fusion clip resizes the clips to HD. The full resolution of the individual 4K clips is not available in Fusion. To maintain the full resolution of course clips, bring only one clip into the Fusion composition from the Edit or Cut page Timeline, and then bring other clips into the Fusion composition using the Media Pool.