< Previous | Contents | Next >
— To rename an Underlay Box: Option-click the Underlay Box to select just the box and not the contents, and then right-click it and choose Rename (or press F2). Type a new name into the Rename dialog and click OK or press Return.
— To change the color of an Underlay Box: Option-click the Underlay Box to select just the box and not the contents, and then right-click it and choose a color from the Set Color submenu.
— To put nodes inside of an Underlay Box: Select the nodes you want to place inside an
Underlay Box, and then drag them to fit inside. The Underlay Box must be big enough to fit all the nodes. Alternatively, you can place an Underlay Box near a collection of nodes you want to put inside it, and then resize the Underlay Box to encompass all those nodes.
— To move an Underlay Box and all its nodes: Once nodes have been placed inside an Underlay Box and have been deselected, you can move the entire collection of nodes together by dragging the Underlay Box by its title bar.
— To remove nodes from an Underlay Box: There are two ways you can remove nodes from an Underlay Box.
— With both the Underlay Box and nodes deselected, drag a bounding box or Command-click to select all nodes in the box you want to remove, and drag them out.
— Resize the Underlay Box so that it’s smaller than the collection of nodes it originally encompassed. Once an Underlay Box is so small that even the last node sticks out beyond its edge, those nodes are automatically removed from the Underlay Box, and you can move or delete the Underlay Box without moving those nodes.
— To delete an Underlay Box and all nodes within: Select an Underlay Box and press the Delete key to delete both the Underlay Box and all nodes found inside it. If you don’t also want to delete the nodes, first drag the nodes out of the box.
— To delete an Underlay Box but keep all nodes within: Option-click the Underlay Box to select it and not the nodes, and then press the Delete key. The nodes within remain where they were.
![]()
Node Thumbnails
Once a source or an effect has been added to the Node Editor, it’s represented by a node. By default, nodes are rectangular and thin, making it easier to fit reasonably complicated grades within a relatively small area. However, if you like, you can also display node thumbnails.
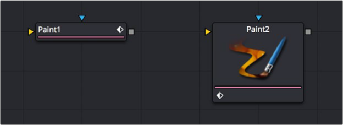
A node in the Node Editor shown without and with a thumbnail.
Nodes can be displayed as a small rectangle or as a larger square. The rectangular form displays the node’s name in the center, while the square form shows either the tool’s icon or a thumbnail of the image it is outputting.

TIP: Even if you’re not displaying node thumbnails, you can quickly obtain detailed information about a node and the data it’s processing by hovering your pointer over it in the Node Editor and viewing the tooltip bar below.
TIP: Even if you’re not displaying node thumbnails, you can quickly obtain detailed information about a node and the data it’s processing by hovering your pointer over it in the Node Editor and viewing the tooltip bar below.
TIP: Even if you’re not displaying node thumbnails, you can quickly obtain detailed information about a node and the data it’s processing by hovering your pointer over it in the Node Editor and viewing the tooltip bar below.