< Previous | Contents | Next >
specifically for keying greenscreen. That key group can then be passed to another artist who refines the key, builds the mattes, and cleans up the clips. The setting can then be saved out and loaded back into the master comp. As versions are improved, these settings can be reloaded, updating the master comp.
— To save a group: Right-click a group and choose Settings > Save As from the contextual menu.
— To reuse a group: Drag it from your computer’s file browser directly into the Node Editor.
This creates a new group node in the node tree with all the same nodes as the group you saved.
— To load the settings from a saved group to another group with the same nodes: Right-click a group in the Node Editor and choose Settings > Load from the contextual menu.
— To save a group: Drag the group from the Node Editor into the opened Bin window. A dialog will appear to name the group setting file and the location where it should be saved on disk. The .setting file will be saved in the specified location and placed in the bins for easy access in the future.
Macros
Some effects aren’t built with one tool, but with an entire series of operations, sometimes in complex branches with interconnected parameter controls. Fusion provides many individual effects nodes
for you to work with but gives users the ability to repackage them in different combinations as
self-contained “bundles” that are either macros or groups. These “bundles” have several advantages:
— They reduce visual clutter in your node tree.
![]()
— They ensure proper user interaction by allowing you to restrict which controls from each node of the macro are available to the user.
— They improve productivity by allowing artists to quickly leverage solutions to common compositing challenges and creative adjustments that have already been built and saved.
Macros and groups are functionally similar, but they differ slightly in how they’re created and presented to the user. Groups can be thought of as a quick way of organizing a composition by reducing the visual complexity of a node tree. Macros, on the other hand, take longer to create because of how customizable they are, but they’re easier to reuse in other comps.
Creating Macros
While macros let you save complex functions for future use in very customized ways, they’re actually pretty easy to create.
1 Select the nodes you want to include in the macro you’re creating. Because the macro you’re creating will be for a specific purpose, the nodes you select should be connected together to produce a particular output from a specific set of inputs.

TIP: If you want to control the order in which each node’s controls will appear in the macro you’re creating, Command-click each node in the order in which you want it to appear.
TIP: If you want to control the order in which each node’s controls will appear in the macro you’re creating, Command-click each node in the order in which you want it to appear.
TIP: If you want to control the order in which each node’s controls will appear in the macro you’re creating, Command-click each node in the order in which you want it to appear.
2 Right-click one of the selected nodes and choose Macro > Create Macro from the contextual menu.
A Macro Editor window appears, showing each node you selected as a list, in the order in which each node was selected.
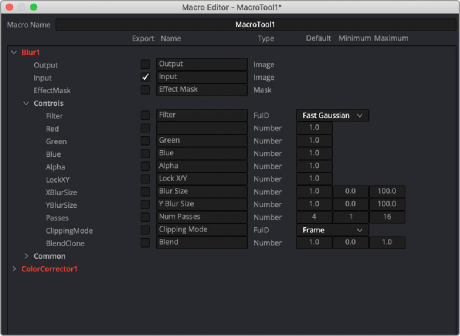
![]()
The macro editor with a Blur node and Color Corrector node.
3 First, enter a name for the macro in the field at the top of the Macro Editor. This name should be short but descriptive of the macro’s purpose. No spaces are allowed, and you should avoid special characters.
4 Next, open the disclosure control to the left of each node that has controls you want to expose to the user and click the checkbox to the right of each node output, node input, and node control that you want to expose.
The controls you check will be exposed to users in the order in which they appear in this list, so you can see how controlling the order in which you select nodes in Step 1, before you start editing your macro, is useful. Additionally, the inputs and outputs that were connected in your node tree are already checked, so if you like these becoming the inputs and outputs of the macro you’re creating, that part is done for you.
For each control’s checkbox that you turn on, a series of fields to the left of that control’s row lets you edit the default value of that control as well as the minimum and maximum values that control will initially allow.
5 When you’re finished choosing controls, click Close.
6 A dialog prompts you to save the macro. Click Yes.