< Previous | Contents | Next >
For example, the RGB channels can be viewed in the main viewer, while the alpha channel is displayed in a subview. For the most part, the subview is a fully functional miniature viewer, with its own contextual menu and options. It responds to the same keyboard shortcuts and navigation controls as any other viewer. However, there are several view types designed for use only in the subview, including the Navigator, Magnifier, Color Inspector, and Image Info.
Showing and Hiding Subviews
Subviews are easily shown and hidden.
— Click the Subview button in the View toolbar.
— Choose Views > Subview > Enabled from the contextual menu.
— Click a viewer, and press the V key.
![]()
The Subview button in the viewer toolbar
Changing the Subview Type
The Subview button enables and disables the subview, which usually shows the last subview you chose. You can change this at any time.
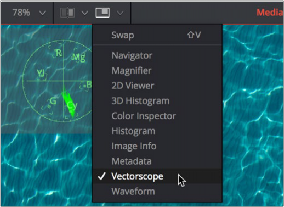
— Click the small arrow to the right of the Subview button to open its menu and choose which subview you want.
— Right-click within a subview to bring up the subview’s contextual menu.
The Subview drop-down menu and contextual menu show all the available subview types. Once you choose an option from the list, that view will be displayed in the subview, and the Subview button will show and hide it as you wish.
Swapping the Subview with the Main View
It’s possible to swap the contents of the main viewer and the subview for select subview types. However, certain view types, such as the Color Inspector and Magnifier, can only be used in the subview. In these cases, the swap will not take place.