< Previous | Contents | Next >
![]()
DaVinci Resolve supports the new HDR10+ HDR format by Samsung. Please note that this support is a work in progress as this is a new standard. When enabled, an HDR10+ palette exposes trimming parameters that let you trim an automated downconversion of HDR to SDR, creating metadata to control how HDR-strength highlights look on a variety of supported televisions and displays. This is enabled and set up in the Color Management panel of the Project Settings with the Enable HDR10+ checkbox. Turning HDR10+ on enables the Dolby Vision palette in the Color page.

HDR10+ settings in the Color Management panel of the Project Settings
HDR Vivid
HDR Vivid is the HDR video technology standard released by the China UHD Video Industry Alliance (CUVA). Mastering in this format assures wide compatibility with HDR televisions, phones, computers, and other devices in China.

HDR Vivid settings in the Color Management panel of the Project Settings
Lookup Tables
DISPLAY LUT
DISPLAY LUT
DISPLAY LUT
Raw Image Data
Raw Image Data
Raw Image Data
Camera Raw Decoding
Camera Raw Decoding
Camera Raw Decoding
INPUT LUT
INPUT LUT
INPUT LUT
Color Page Image Processing
Color Page Image Processing
Color Page Image Processing
OUTPUT LUT
OUTPUT LUT
OUTPUT LUT
Deliver Page Output Media
Deliver Page Output Media
Deliver Page Output Media
Monitored Image
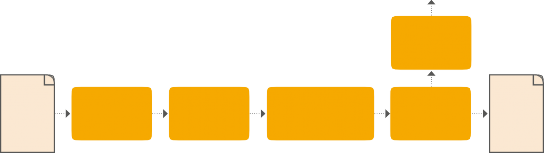
This group of controls lets you add LUTs to the Resolve image processing pipeline that affect every timeline in the entire project all at once. These LUTs can be used for a wide variety of functions, such as to trim Timeline grades, apply Log to Linear conversions, simulate film output, and limit the signal to accommodate Broadcast Safe requirements. Different options let you insert image processing to different stages of the pipeline as seen in the following diagram:
Keep in mind that since you can apply both 1D and 3D LUTs simultaneously, 1D LUTs at each step are always applied before 3D LUTs.
— Input Lookup Table: Two drop-down menus let you add 1D and/or 3D LUTs that process the current Timeline before every other image processing operation in DaVinci Resolve.
— Output Lookup Table: Two drop-down menus let you add 1D and/or 3D LUTs that process the current Timeline after the operations applied in the Color page, but before the temporarily applied Display LUT.
![]()
— Video Monitor Lookup Table: Two drop-down menus let you add 1D and/or 3D LUTs that process the current Timeline after every other image processing operation in DaVinci Resolve. However, Display LUTs are only temporarily applied for purposes of monitoring; they’re never applied to rendered media, or to the signal that is output to tape using the controls in the Deliver page. Display LUTs are particularly valuable for applying a film print emulation LUT in a Log workflow, or for applying a monitor calibration LUT if you’re outputting to a single display and you don’t have dedicated outboard calibration hardware.
Here’s an example. It’s common, when grading for film output using a Log workflow, that you’ll use the Display LUT drop-down menu to apply a film emulation LUT that simulates the image as it will be output from the film recorder, taking into account the film lab and print stock used, in order to make sure that the image you’re grading will appear as close as possible to what the eventual release print will look like in the cinema.
— Color Viewer Lookup Table: Two drop-down menus let you add 1D and/or 3D LUTs that process the image shown in the Viewer on your computer display, independently of the Display LUT that’s used to output to your broadcast display. By default, this follows the Video Monitor LUT setting, but you can also use this option to apply a specific calibration transform for your computer monitor. Alternately, you could use it to desaturate the GUI Viewer to be able to specifically evaluate image contrast, or if you don’t want to have to argue with your client over which display looks correct.
— Scopes Lookup Table: Ordinarily, DaVinci Resolve’s internal software video scopes provide an unbiased analysis of the actual video data levels within the Resolve image processing pipeline. However, you can choose to have the software scopes use the Video Monitor LUT selection, or any other LUT installed on your system, to transform this analysis to reflect the monitored output.
— 3D Lookup Table Interpolation: Lets you choose the processing quality of both LUT and DCTL operations in DaVinci Resolve. 3D Lookup tables (LUTs) are 3D tables of red, green, and blue values that specify an output color value for each input color value, thereby providing a method of making color transformations using pre-calculated data. While powerful, 3D LUTs have finite
detail; for example, one might have a 17x17x17 LUT that specifies 4913 individual color transforms. When applied to a floating point image that contains more data than the LUT specifies transforms for, color values falling between the 17x17x17 color transforms specified by the LUT need to
be interpolated. You can choose from two methods that trade off processing efficiency for higher quality:
— Trilinear: (Default) Trilinear is backward compatible with grades that use LUTs from previous versions of DaVinci Resolve and matches the look of LUTs being applied in other applications.
— Tetrahedral: Tetrahedral is slightly more processor-intensive, but results in higher image quality LUT and DCTL processing, with reduced color-banding. Tetrahedral is recommended for projects that don’t need backward compatibility with previous versions of DaVinci Resolve or LUTs created in other applications.