< Previous | Contents | Next >
Keyframing in the Inspector
Most parameters in most effects nodes can be keyframed in order to create animated effects such as animated transforms, rotoscoping with splines, dynamically altering warping behaviors, and more; the list is endless.
For convenience, a set of keyframing controls is available within the Inspector next to each keyframable parameter. These controls are:
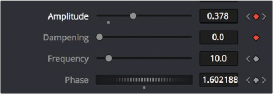
— A gray Keyframe button to the right each keyframable parameter. Clicking this gray button creates a keyframe at the current position of the playhead, and turns the button orange.
— Whenever the playhead is sitting right on top of a keyframe, this button turns orange. Clicking an orange Keyframe button deletes the keyframe at that frame and turns the button gray again.
— Small navigation arrows appear to the right and left if there are more keyframes in those directions. Clicking on navigation arrows to the right and left of keyframes jumps the playhead to those keyframes.
Orange Keyframe buttons in the Inspector show there’s a keyframe at that frame
![]()
Once you’ve keyframed one or more parameters, if Show Modes/Options has been enabled, the node containing the parameters you keyframed displays a Keyframe badge to show that node has been animated.
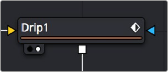
A keyframed node displays a Keyframe badge in the Node Editor
Once you’ve started keyframing node parameters, you can edit their timing in the Keyframes Editor and/or Spline Editor.
Removing Animation in the Inspector
1 Right-click the keyframe control of the parameter you want to remove animation from.
2 Choose Remove [Name of parameter] from the contextual menu.