< Previous | Contents | Next >
— Drag left or right using the middle mouse button or use the scroll bar along the bottom and right side of the graph.
There are several ways to navigate the graph area using the Spline Editor contextual menu as well.
— Choose Scale > Scale to Fit (Command-F) to fit all active splines into the graph area.
— Choose Scale > Scale to Rectangle (Command-R) to draw a bounding box around the area of the graph you want centered and scaled. This has the same effect as clicking the Zoom to Rectangle button.
— Choose Scale > Default to reset the scaling of the graph area to default values.
— Choose Scale > Zoom In/Zoom Out to scale the graph area. This performs the same functions as pressing the + and - keys on the keyboard.
— Choose Scale > Auto Fit to scale the graph to fit all splines dynamically as you make splines visible and hidden. If the scaling is changed with Auto-Fit enabled, the graph area will scroll as you play the comp to view all the keyframes.
— Choose Scale > Auto Scroll to scroll the graph area if the splines fall outside the graph horizontally as you play.
— Choose Scale > Manual to disable all automatic attempts at showing splines in the graph.
— Choose Options > Fit Times to automatically scale along the X-axis to fit the selected spline.
All visible splines are taken into account, not just the newly selected spline. With this option off, activating a new spline will not change the horizontal scale.
— Choose Options > Fit Values to automatically scale along the Y-axis to fit the selected spline.
All visible splines are taken into account, not just the newly selected spline. With this option off, activating a new spline will not change the vertical scale.
![]()
Markers
Markers help identify important frames in a project. They may indicate a frame where a ray gun shoots a beam in the scene, the moment that someone passes through a portal in the image, or any other important event in the composite.

NOTE: Markers attached to clips in the Cut, Edit, Color, or Fairlight pages Timeline are not visible in Fusion’s Spline Editor.
NOTE: Markers attached to clips in the Cut, Edit, Color, or Fairlight pages Timeline are not visible in Fusion’s Spline Editor.
NOTE: Markers attached to clips in the Cut, Edit, Color, or Fairlight pages Timeline are not visible in Fusion’s Spline Editor.
Markers added to the Timeline in the Cut, Edit, Fairlight, or Color page will appear in the Keyframes Editor and Spline Editor of the Fusion page. They can also be added from the Keyframes Editor or the Spline Editor while working in Fusion Studio or the Fusion page. Markers appear along the top of the horizontal axis Spline Editor’s Time Ruler. They are displayed as small blue shapes, and when selected, a line extends from each guide down vertically through the graph.

Unselected markers appear as blue shapes along the top, while selected markers display a vertical line running through the graph
Working with Markers
Markers call attention to a particular frame within a comp. They can be named, displayed in a list, and edited. After you add markers, you can easily jump the playhead between them, change their position, or delete them altogether.
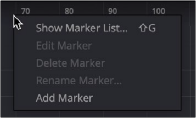
Markers can be added by right- clicking in the horizontal time axis
— Right-click in the horizontal axis Time Ruler and choose Add Marker.
— Drag the marker up outside the Spline Editor panel.
— Right-click on the marker and then choose Delete Marker from the menu.
— Select the marker and then press Delete or Backspace on the keyboard.
— From the Marker List, select a guide in the list and click the Del button.
— Drag the marker handle along the time axis.
![]()
— Right-click in the marker area and choose Options > Enable Marker Grab, and then drag the marker’s vertical line to move the guide.
— Right-click on a marker and choose Set Current Time To [Frame number].
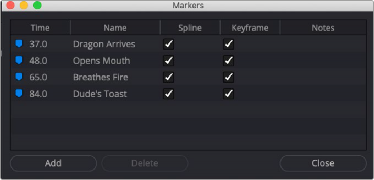
Using the Marker List
The Marker List is a list of all markers in the current comp. It can display the markers from either the Keyframes Editor, the Spline Editor, or both panels simultaneously. Clicking on the frame number or name of a guide causes the current time to change to that marker’s frame. Since the Marker List is a floating window, it can remain open, allowing you to quickly jump to different markers while you work in the Spline Editor.
— Right-click in the horizontal axis and choose Show Marker List, or press Shift-G.