
< Previous | Contents | Next >
Keyframes are specific frames in an animation where control points are set to exact values on a given parameter. Interpolation is the method used to fill in the unknown values between two keyframes.
Fusion automatically interpolates between two keyframes. However, you may want to modify the interpolation to achieve a specific style of animation. The Spline Editor includes several interpolation methods you can choose from using the toolbar.
Interpolation buttons in the toolbar: Smooth, Linear, Invert, Step In, and Step Out
Smooth
A smoothed segment provides a gentle keyframe transition in and out of the keyframe by slightly extending the direction handles on the curve. This slows down the animation as you pass through the keyframe. To smooth the selected keyframe(s), press Shift-S or click the toolbar’s Smooth button.
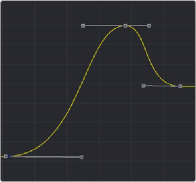
![]()
Smooth interpolation between keyframes
Linear
A linear segment effectively takes the shortest route between two control points, which is a straight line. To make the selected keyframe(s) linear, press Shift-L or click the Linear button in the toolbar.

Linear interpolation between keyframes

TIP: Invert is used only for non-animated LUT splines, which are currently only available in the LUT Editor window.
TIP: Invert is used only for non-animated LUT splines, which are currently only available in the LUT Editor window.
TIP: Invert is used only for non-animated LUT splines, which are currently only available in the LUT Editor window.