< Previous | Contents | Next >
— Show Tips: Toggles if tooltips are displayed or not. This option is also available via the Show submenu when right-clicking in the Spline Editor graph.
— Autosnap Points: When moving points in the Spline Editor, these will snap to the fields or frames or can be moved freely. This option is also available via the Options submenu when right-clicking in the Spline Editor graph.
— Guides: When moving points in the Spline Editor, these will snap to guides as well. This option is also available via the Options submenu when right-clicking in the Spline Editor graph.
— Autosnap Guides: When moving or creating guides, these will snap to the fields or frames or can be moved freely. This option is also available via the Options submenu when right-clicking in the Spline Editor graph.
— Autoscale: Keeps the Spline Editor scales intact on changing the editable spline content of the graph. This scale is also available via the Options submenu when right-clicking in the Spline Editor graph.
— Scroll: Scrolls horizontally and vertically to show all or most of the spline points. This option is also available via the Scale submenu when right-clicking in the Spline Editor graph.
— Fit: Zooms to fit all points within the spline graph, if necessary. This option is also available via the Scale submenu when right-clicking in the Spline Editor graph.
LUT View Options
These settings let you control how the LUT view is displayed.
— Independent Handles: Enabling this option allows the In or Out direction handle on newly created key frames to be moved independently without affecting the other.
— Show Key Markers: Small colored triangles will be displayed at the top of the Spline Editor Time Ruler to indicate key frames on active splines. The colors of the triangles match the colors of
the splines.
![]()
— Show Tips: Toggles whether tooltips are displayed.
Splines
Options for the handling and smoothing of animation splines, tracker path defaults, and rotoscoping are found in the Splines preferences.
— Autosmooth: Automatically smooths out any newly created points or key frames on the splines selected in this section. You can choose to automatically smooth animation splines, B-Splines, polyline matte shapes, LUTs, paths, and meshes.
— B-Spline Modifier Degree: This setting determines the degree to which the line segments influence the resulting curvature when B-Splines are used in animation. Cubic B-Splines determine a segment through two control points between the anchor points, and Quadratic B-Splines determine a segment through one control point between the anchor points.
— B-Spline Polyline Degree: This setting is like the one above but applies to B-Splines used for masks.
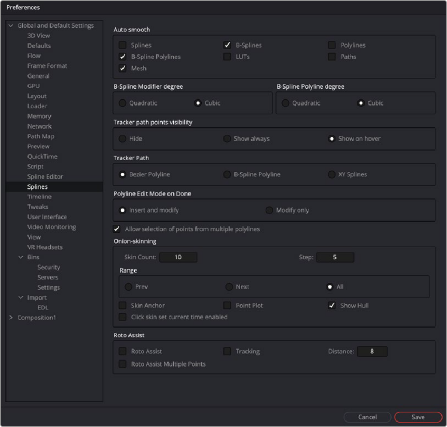
The Splines preferences
— Tracker Path Points Visibility: This setting determines the visibility of the control points on tracker paths. You can show them, hide them, or show them when your cursor hovers over the path, which is the default behavior.
![]()
— Tracker Path: The default tracker creates Bézier-style spline paths. Two other options in this setting allow you to choose B-Spline or XY Spline paths.
— Polyline Edit Mode on Done: This setting determines the state of the Polyline tool after you complete the drawing of a polyline. It can either be set to modify the existing control points on the spline or modify and add new control points to the spline.
— Onion Skinning: The Onion Skinning settings determine the number of frames displayed while rotoscoping, allowing you to preview and compare a range of frames. You can also adjust if the preview frames only from the frame prior to the current frame, after the current frames, or split between the two.