< Previous | Contents | Next >
— Auto Control Close Tools: When enabled, only the active (red outlined) tool in the Node Editor will have controls displayed. Any previous active node’s tools will be closed in the Inspector. When disabled, any number of tools may be opened to display parameters at the same time. This setting has no effect if the Auto Control Hide checkbox is enabled.
— Auto Control Close Modifiers: When enabled, only one modifier’s parameters will be displayed for the active node. Any additional modifiers for the active node will show only their header.
— Auto Control Advance: If the Auto Control Advanced checkbox is enabled, the Tab key and Return/Enter key will cause the keyboard focus to advance to the next edit box within the Inspector. When disabled, Return/Enter will cause the value entered to be accepted, but the keyboard focus will remain in the same edit box of the control. The Tab key can still be used to advance the keyboard focus.
— Show Controls for Selected: When this option is disabled, only the active tool’s parameters are shown in the Inspector. By default, it is enabled, showing controls for the active tool as well as all selected tools.
— Combined Color Wheel: When the Color Corrector tool is displayed in the Inspector, enabling this checkbox will show one color wheel with buttons to switch between the master, shadow, midtones, and highlight channels. Otherwise, four color wheels are displayed in the Inspector.
— Gamma Aware Color Controls: This setting adjusts color correction nodes when working with Rec. 709 images in a non-color managed project. Rec. 709 images appear correct on the computer monitor because monitors have a gamma adjustment built in. When working in the Rec. 709 color space without color management, enabling Gamma Aware color removes the gamma, applies the color correction as if it where linear, and then reapplies the gamma.
For Rec. 709 images, enable the Gamma Aware setting and enter a Gamma value of 2.4. In a color managed linear project, this should be set to Off or a value of 1.0. When dealing with mixed color spaces, Fusion reads the metadata from the image and sets the Aware gamma value based on the metadata available.
![]()
— Grab Distance: This slider ranges from 1 to 10 and defaults to 5. It designates the active area around the mouse pointer and can be modified if you have difficulties in selecting points for modification in paths and spline curves. Smaller values will require a more accurate selection with the mouse pointer.
Touch Scrolling and Mouse Wheel
This group of settings allows you to configure which, if any, keyboard modifiers are needed to pan or zoom a panel when using a trackpad or middle mouse wheel.
Video Monitoring
This setting is only available in Fusion Studio. Control over video hardware for the Fusion Page is done in the DaVinci Resolve preferences. The Video Monitoring preferences are used to configure the settings of Blackmagic Design capture and playback products such as DeckLink PCIe cards and UltraStudio i/O units.
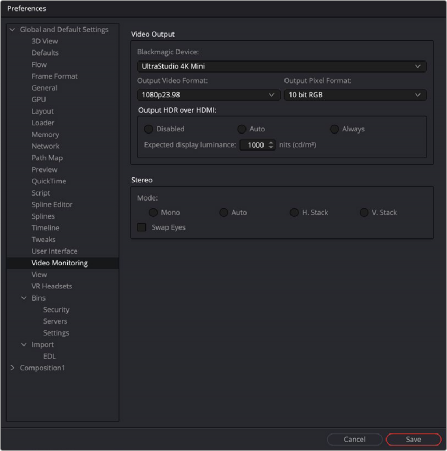
The Video Monitoring preferences
Video Output
![]()
This group of drop-down menus allows you to select the type of video I/O device you have installed, the output resolution, and the pixel format. These settings have nothing to do with your rendered output; it is only for your display hardware.
The Output HDR over HDMI settings are used to output the necessary metadata when sending high dynamic range signals over HMDI 2.0a and have it correctly decided by an HDR capable video display.
The Auto setting detects the image’s values and outputs HDR. This will not affect non HDR images.
The Always setting forces HDR on all the time. This can can be useful when checking non HDR and HDR grades.
When Auto or Always is selected, you can then set the “nit” level (slang for cd/m2) to whatever peak luminance level your HDMI connected HDR display is capable of.
Stereo Mode
This group of settings configures the output hardware for displaying stereo 3D content.
— Mono will output a single non stereo eye.
— Auto will detect which method with which the stereo images are stacked.
— Use the Vstack option if the stereo images are stacked vertically as left on top and right at the bottom.
— Use the Hstack option if the stereo images are stacked horizontally as left and right. The Swap eyes checkbox will swap the eyes if stereo is reversed.