< Previous | Contents | Next >
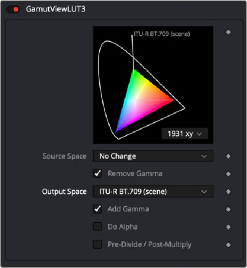
3 If you choose the Gamut View LUT, then choose Edit from the bottom of the LUT menu to configure the LUT.
4 In the LUT Editor, set the Output Space to the target color space you want.
5 Enable the Add Gamma checkbox to apply the gamma curve based on the selected color space.
Gamut View LUT Output Space set to Rec. 709 for HD with the Add Gamma checkbox enabled

TIP: If your monitor is calibrated differently, you need to select a LUT that matches your calibration.
TIP: If your monitor is calibrated differently, you need to select a LUT that matches your calibration.
TIP: If your monitor is calibrated differently, you need to select a LUT that matches your calibration.
![]()
Whether you use the Gamut View LUT or a LUT for your specific monitor calibration, you can save the viewer setup as the default.
— Right-click in the viewer, and then choose Settings > Save Defaults.
For every comp, the viewer will now be preconfigured based on the saved defaults.
For more information on Viewer LUTs, see Chapter 69, “Using Viewers.” in the DaVinci Resolve Reference Manual or Chapter 7 in the Fusion Reference Manual.
Using Resolve Color Management
If you’re using the Fusion page within Davinci Resolve, you have the option of enabling
DaVinci Resolve’s scene-referred color management, instead of inserting Gamut and CineonLog nodes. When DaVinci YRGB Color Managed (RCM) is enabled, the color of MediaIn nodes in the Fusion page is handled differently. The RCM automatically determines the input color spaces of all files used for all MediaIn nodes in the Fusion page, which then automatically get converted to linear gamma.
The MediaOut node then gets converted back into the Color Processing mode to get graded in the Color page or further edited in the Edit page Timeline.
Despite the seeming complexity of color management, using RCM is actually simple. In essence, all you have to do is (A) turn on RCM, and (B) choose the Color Processing mode and Output Color Space combination you want to use.
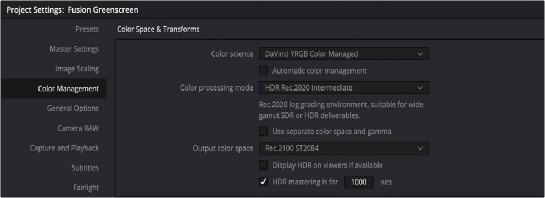
1 Open the Color Management panel of the Project Settings.
2 Choose DaVinci YRGB Color Managed from the Color Science drop-down menu.
3 Check the Automatic color management box for a simplified selection, or un-check the box to adjust the Color Processing mode and Output color spaces manually.
4 Set the desired options for the Color Processing mode and Output Color Space RCM settings.
When DaVinci YRGB Color Managed is enabled, Timeline color space is used for all MediaIn nodes in the Fusion page.
1 Enable DaVinci YRGB Color Management as explained above.
![]()
2 Save and close the Settings dialog.
3 In the Media Pool, select the clip or clips you want to assign a new Input Color space.
4 Right-click one of the selected clips.
5 Choose the Input Color Space that corresponds to those clips from the contextual menu.
Using RCM eliminates a few steps, since the input color space math used to transform the source preserves all wide-latitude image data, making highlights easily retrievable without any extra steps. With RCM enabled, there is no need to insert CineonLog or Gamut nodes while in the Fusion page. The transforms from and to linear are done automatically based on the RCM settings. Switching to the Fusion page converts the images to linear and enables the LUT button in the viewers with the Managed LUT selected. The Managed LUT uses the RCM settings to take a linear image and display it based on the RCM output color space.
For more information on Resolve Color Management, see Chapter 9, “Data Levels, Color Management, and ACES.”