< Previous | Contents | Next >
If you’ve gone to the cinema and seen any recent superhero movie, you will have seen the results of sophisticated 3D rendering, combined with a whole lot of compositing. 3D applications can render very realistic images but the time it takes to render each frame of those realistic images can be measured in hours, not minutes. Any change to the 3D images, even relatively simple operations like color adjustments, changes to focus, filtering, or additional masking, means these images will need to be re-rendered entirely, which means you waiting, often many times over. For efficiencies sake, it’s
much faster to make iterative changes that can be accomplished with 2D image processing operations in Fusion instead.
To have the flexibility you need to make common changes to 3D images after-the-fact, the various attributes that make up the 3D scene are separated and rendered as different image sequences, often referred to as render passes. For example, render passes are often created for attributes like raw color, shadows, and reflections, that can be recombined as a 2D composite to produce the final result.
Having different attributes rendered into different image sequences gives you a significant amount of flexibility, since now each image attribute can be color corrected, blurred, or further processed independently of the other attributes of the image, with fast-processing operations in Fusion.
The most common render passes that are typically generated come from the RGBA channels of the 3D scene. These are collectively called beauty passes and can consist of attributes like color, shadows, lighting, reflections, environment, and others.
Render passes can also contain non-RGB data. Different effects applications have different names for these passes, such as Data Channels, or AOVs (Arbitrary Output Variables). In Fusion, these channels are called Auxiliary Channels, and they contain 3D data such as Depth, Normals, Motion Vectors, and UV Coordinates (to name just a few).
![]()
When compositing a 3D render consisting of multiple render passes, the beauty passes are handled using one technique, and the Auxiliary Channels are handled with another. Since Fusion nodes carry RGBA channels by default, we’ll cover beauty passes first, and then explain how to work with Auxiliary Channels later in this chapter.
Compositing with Beauty Passes
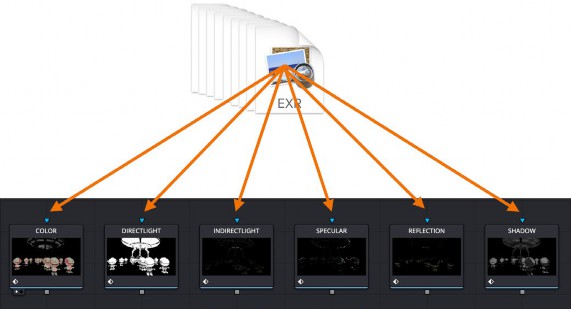
Each attribute of a beauty pass can be rendered into individual image sequences, so you end up with a series of numbered images, one for the diffuse pass, one for the reflection pass, another of the shadow pass, and so on. Alternatively, all the passes can be contained in a multi-part EXR image sequence. Multi-part EXRs benefit from requiring a bit less file management, but the passes are handled similarly in Fusion using either method.
A single MediaIn or Loader node only handles a single beauty pass since only one set of RGBA channels gets output per node. Setting up your composite in Fusion requires you to use a separate MediaIn or Loader node for each pass.

A MediaIn or Loader node is needed for each beauty pass.

TIP: The EXR format in Fusion is optimized when multiple Loaders are used to read the same EXR file. The file is only loaded once to access all the channels.
TIP: The EXR format in Fusion is optimized when multiple Loaders are used to read the same EXR file. The file is only loaded once to access all the channels.
TIP: The EXR format in Fusion is optimized when multiple Loaders are used to read the same EXR file. The file is only loaded once to access all the channels.
Beauty Pass Setup
Separated components of 3D renders, such as diffusion, shadows, or reflections, can be rendered individually using RGB channels. If you’re provided with individual image sequences for each image component, they’ll import and open in Fusion and can be displayed in the viewer, just like any other clip. If you’re using multi-part EXR files, then you essentially have multiple RGB images contained within a single file. However, the MediaIn and Loader nodes can only make use of one set of RGB channels at a time. If you want to composite multiple RGB beauty passes together with one another, you must use multiple MediaIn or Loader nodes that point to the same image sequence but are assigned to different passes contained in the EXR file.

TIP: It is wise to rename each Loader or MediaIn to represent the beauty pass it contains.
TIP: It is wise to rename each Loader or MediaIn to represent the beauty pass it contains.
TIP: It is wise to rename each Loader or MediaIn to represent the beauty pass it contains.
![]()
Multiple Loader or MediaIn nodes connect to a multi-part EXR image sequence
Mapping Each Set of Beauty Passes to a Particular Node
Depending on whether you’re using a MediaIn node or a Loader node, beauty passes can be mapped to RGB channels using either the Image tab, the Channels tab, or the Format tab in the Inspector.
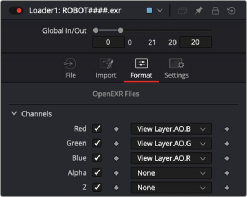
When using a Loader node, the Loader’s Format tab is used.
Beauty passes mapped to red, green, and blue channels in a Loader node
The MediaIn’s Image tab includes a Layer menu. Any pass included in a multi-part EXR image sequence can be selected from this menu and automatically assigned to the RGBA channels.

![]()
The Layer menu in a MediaIn node showing headings for combined channel passes
In most cases, the menu shows the combined channel passes, meaning the individual red, green, blue, and alpha channels cannot be selected. Because the alpha channel is not included in many beauty passes, you sometimes need to borrow the alpha channel from a different beauty pass. For this reason, it’s often better to use the Channels tab for mapping the individual channels of a beauty pass to the channels of the MediaIn node.
The MediaIn node’s Channels tab or the Loader’s Format tab provides access to individual channels.
The MediaIn node in DaVinci Resolve and the Format tab in a Loader node include the same channel mapping functionality. The Channels tab and the Format tab include individual RGBA menus at the top of the tab. You can use these menus to map the RGBA channels from any pass contained in the multi-part EXR. For instance, if you want to map the Ambient Occlusion pass to the RGB channels, choose AO. R (Red) from the Red channel menu, AO. G (Green) from the Green channel menu, and AO. B (Blue) from the Blue channel menu.
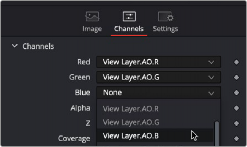

TIP: Different 3D applications will label beauty passes in different ways. For instance, the name for an Ambient Occlusion beauty pass may be AO, AM_OCC, or some other abbreviation.
TIP: Different 3D applications will label beauty passes in different ways. For instance, the name for an Ambient Occlusion beauty pass may be AO, AM_OCC, or some other abbreviation.
TIP: Different 3D applications will label beauty passes in different ways. For instance, the name for an Ambient Occlusion beauty pass may be AO, AM_OCC, or some other abbreviation.
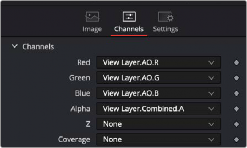
A pass’ individual channels mapped to the red, green, blue, and alpha channels in the MediaIn node
![]()
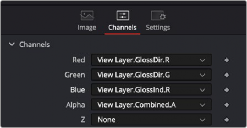
The Ambient Occlusion beauty pass does not include an alpha channel. To composite it, you can reuse the alpha channel pass from another beauty pass. In the image below, the alpha channel is mapped using the combined render pass’ alpha channel.

TIP: When using the Format tab in the Loader node, the checkbox next to each channel needs to be turned on for the corresponding channel to become available in the
node’s output.
TIP: When using the Format tab in the Loader node, the checkbox next to each channel needs to be turned on for the corresponding channel to become available in the
node’s output.
TIP: When using the Format tab in the Loader node, the checkbox next to each channel needs to be turned on for the corresponding channel to become available in the
node’s output.
The alpha channel from a different beauty pass combined with the Ambient Occlusion pass
Compositing Multiple Beauty Passes in the Node Editor
Once all of your passes are brought in and mapped to RGBA channels, you’ll end up with a series of MediaIn or Loader nodes. How many MediaIn and Loader nodes is really up to your workflow. There is no predefined number of passes you will use. Every studio decides for themselves the standard set. However, there are common render passes that are involved in most composites. The following is a list of commonly used render passes and their generic names.


Commonly used beauty passes, compared
![]()
Compositing multiple beauty passes into a single output image is relatively straight forward. 3D rendering applications typically output linear gamma, so no Gamut or other color space conversion nodes are required if you’re keeping the image in a linear color space for ease of compositing.
The basic compositing is accomplished with either a Merge node or a Channels Booleans node. Both allow for additive combining of render passes. There’s no strict requirement for compositing each pass in any particular way, although in most situations a simple additive composite should work
just fine.
1 Connect a Color pass to the background input of a Merge node.
2 Connect a Direct Lighting pass to the foreground input.
3 Adjust the Alpha gain and Blend parameters to get the look you desire.
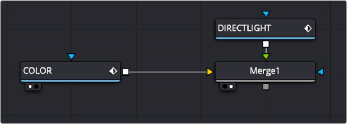
Compositing beauty passes starts by connecting a background and foreground into a Merge node
If you prefer, you can use a Channels Booleans node to make the same composite. In this case, there is no technical difference between the two nodes.
1 Connect a Color pass to the background input of a Channels Booleans node.
2 Connect a Direct Light pass to the foreground input.
3 Choose Add from the Operations menu
4 Choose Do Nothing from the Alpha To menu.
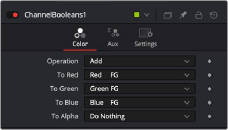
Channel Booleans is set to Add to combine the foreground input and the background input.
One of the exceptions to the steps above are Shadow passes, such as Ambient Occlusion. In that case, a multiply Apply mode is usually employed.
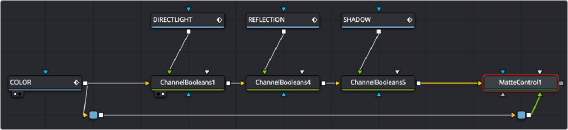
1 Connect last of a sequence of Merge node render passes to the background input of a Merge node.
2 Connect an Ambient Occlusion pass to the foreground input.
![]()
3 Choose Multiply from the Apply Mode menu.
4 Adjust the Gain and Blend parameters to get the look you desire.
As straightforward as this sounds, compositing using a recipe doesn’t always work for every shot. When using different images, you may need to experiment with varying techniques of compositing for the best results.
Embedding Alpha into Beauty Passes
Alpha channels are not included in all beauty passes. If your shot requires that you composite your assembled beauty passes over live-action or some other background, it may be up to you to add the alpha channel from a pass that does include it.
1 Connect the last Merge or Channel Booleans output into the background input of a Matte Control node.
2 Connect the render pass that contains the alpha into the green Foreground input of the Matte Control node.
3 In the Matte Control’s Inspector, choose Combine Alpha from the Combine menu.
4 Choose Copy from the Combine Op menu.