< Previous | Contents | Next >
Automatically Creating Merge Nodes
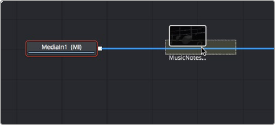
If you want to connect the incoming clip immediately to your node tree as the top layer, or foreground, of a composite, in Fusion Studio select the Loader1 node and then add a second Loader node. In the Fusion page, drag the new clip from the Media Pool right on top of any connection line.
In both cases, the new MediaIn or Loader node automatically becomes the “foreground input”.
Dragging a node from the Media Pool onto a connection (left), and dropping it to create a Merge node composite (right)
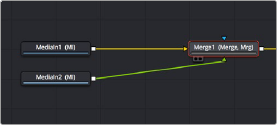
The Node Editor is filled with shortcuts like this to help you build your compositions more quickly. Here’s one for when you have a disconnected node that you want to composite against another node with a Merge node. Drag a connection from the output of the node you want to be the foreground layer, and drop it on top of the output of the node you want to be the background layer. A Merge node will be automatically created to build that composite. Remember: background inputs are orange, and foreground inputs are green.

Adding Clips to a Fusion Composition From the File System
If you drag clips from the file system directly into the Node Editor, they’ll be added to the DaVinci Resolve Media Pool automatically. So, if you have a library of stock animated background textures and you’ve just found one you want to use using your file system’s search tools, you can simply drag it straight into the Node Editor and it’ll be added to the currently selected bin of the Media Pool.
![]()
Dragging a connection from a disconnected node to another node’s output (left), and dropping it to create a Merge node composite (right)
Fixing Problem Edges in a Composite
Most often, the Merge node does a perfectly good job when handed a foreground image with premultiplied alpha transparency to composite against a solid background image. However, from time to time, you may notice a small bit of fringing at the edge of the border of a foreground element and
transparent area, such as seen in the following close-up. This slight lightening at the edge is a tell-tale sign that the clip probably wasn’t premultiplied. The Merge node expects all foreground images with alpha channels to be premultiplied. But this is something that’s easily fixed.
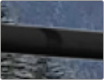
A bit of fringing at the edge of a foreground element surrounded by transparency
Click to select the Merge node for that particular composite, and look for the Subtractive/ Additive slider.
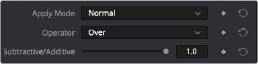
The Subtractive/Additive slider, which can be used to fix or improve fringing in composites
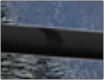
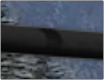
Drag the slider all the way to the left, to the Subtractive position, and the fringing disappears.
![]()
A clip with alpha exhibits fringing (left), and after fixing fringing by dragging the
Subtractive/Additive slider to the left (right)
The Subtractive/Additive slider, which is only available when the Apply mode is set to Normal, controls whether the Normal mode performs an Additive merge, a Subtractive merge, or a blend of both. This slider defaults to Additive merging, which assumes that all input images with alpha transparency are premultiplied (which is usually the case). If you don’t understand the difference between Additive and Subtractive merging, here’s a quick explanation:
— An Additive merge, with the slider all the way to the right, is necessary when the foreground image is premultiplied, meaning that the pixels in the color channels have been multiplied by the pixels in the alpha channel. The result is that transparent pixels are always black, since any
number multiplied by 0 is always 0. This obscures the background (by multiplying with the inverse of the foreground alpha), and then simply adds the pixels from the foreground.
— A Subtractive merge, with the slider all the way to the left, is necessary if the foreground image is not premultiplied. The compositing method is similar to an Additive merge, but the foreground image is first multiplied by its own alpha to eliminate any background pixels outside the
alpha area.
The Additive/Subtractive slider lets you blend between two versions of the merge operation, one Additive and the other Subtractive, to find the best combination for the needs of your particular