< Previous | Contents | Next >
In this next example, we’ll look at how to create a simple text object using the Text+ node.
Then, we’ll see how to use the text generator’s alpha channel in another image to create a more complex composite.
Creating Text Using the Text+ Node
The Text+ node is the primary tool for creating 2D text in the Fusion page. If you are using
DaVinci Resolve, this is also the same Text+ generator available in the Edit page. It is easily accessible right in the toolbar.
The Text+ node is an incredibly deep tool for creating text effects, with six tabs of controls for adjusting everything from text styling, to different methods of layout, to a variety of shading controls including fills, outlines, shadows, and borders. As sophisticated a tool as this is, we’ll only be scratching the surface in this example.
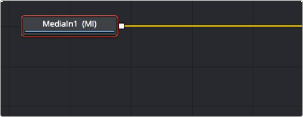
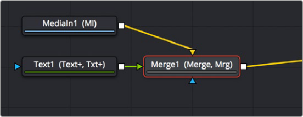
We’ll start with a MediaIn node that will serve as our background selected in the Node Editor. Clicking the Text+ button automatically creates a new Text+ node connected as the foreground input of a Merge node. The same behavior occurs if you are using Fusion Studio, with a Loader node.
![]()
Selecting a node you want to append another node to (top) Clicking the Text+ button on the toolbar automatically creates a Merge composite with the text as the foreground input connection (bottom)
Selecting a Text node opens the default Text panel parameters in the Inspector, and it also adds a toolbar at the top of the viewer with tools specific to that node. Clicking on the first tool at the left lets you type directly into the viewer, or you can type into the Styled Text field in the Inspector.
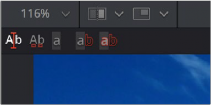
The viewer toolbar for the
Text node with tools for text entry, kerning, and outline controls