< Previous | Contents | Next >
Pulling a Green-Screen Key Using the Delta Keyer
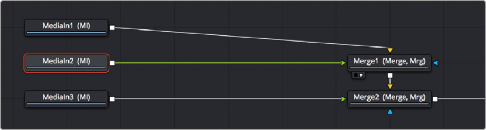
To make this composite, you need to create transparency behind the newscaster. When working in a node tree, you must become accustomed to rearranging existing nodes to make room for new ones. You’ll often move nodes off to the side or up above to make room for the additional nodes.
Creating space after the MediaIn nodes and selecting the second one in preparation for adding a node
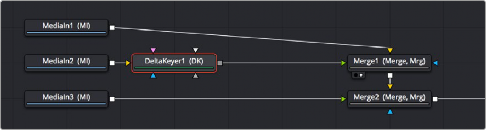
The DeltaKeyer node is the main tool used for green-screen keying. It attaches to the output of the node that represents the green screen—in our example, that is the MediaIn2 node. With the MediaIn2 selected, pressing Shift-Space opens the Select Tool dialog where you can search for and insert any node. Below we have added the DeltaKeyer after the MediaIn2 node but prior to being merged with the background.
![]()
Adding a DeltaKeyer node inline after the MediaIn2 node
The DeltaKeyer node is a sophisticated keyer that is capable of impressive results by combining different kinds of mattes and a clean-plate layer, but it can also be used very simply if the background that needs to be keyed is well lit. And once the DeltaKeyer creates a key, it embeds the resulting alpha channel in its output, so in this simple case, it’s the only node we need to add. It’s also worth noting that, although we’re using the DeltaKeyer to key a green screen, it’s not limited to keying green or blue only; the DeltaKeyer can create impressive keys on any color in your image.
With the DeltaKeyer selected, we’ll use the Inspector controls to pull our key by quickly sampling the shade of green from the background of the image. To sample the green-screen color, drag the Eyedropper from the Inspector over the screen color in the viewer.
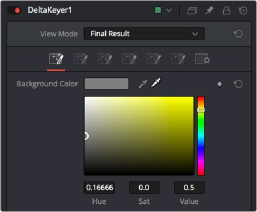
Dragging the Eyedropper to the viewer samples the screen color
As you drag in the viewer, an analysis of the color picked up by the location of the Eyedropper appears within a floating tooltip, giving some guidance as to which color you’re really picking. Meanwhile, if viewing the Merge in a second viewer, we get an immediate preview of the transparency and the image we’ve connected to the background.


![]()
The original image (left), and after sampling the green screen using the Eyedropper from the Inspector (right)
When we’re happy with the preview, releasing the pointer button samples the color, and the Inspector controls update to display the value we’ve chosen.
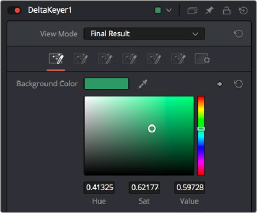
The DeltaKeyer Inspector updates with the sampled color
No matter how good the composite may look, once you’ve selected the screen color to pull a key, you need to load the DeltaKeyer node into the viewer itself. This allows you to evaluate the quality or density of the alpha channel created by the key. Above the viewer, click the Color button in
the viewer toolbar, or click in the viewer and press C to switch the viewer between the RGB color channels of the image and the alpha channel.

Loading the DeltaKeyer into the viewer and clicking the Color button to view the alpha channel being produced
![]()
Black in a matte represents the transparent areas, while white represents the opaque areas. Gray areas represent semi-transparency. Unless you are dealing with glass, smoke, or fog, most mattes should be pure white and pure black with no gray gray areas. If a close examination of the alpha channel reveals some fringing in the white foreground of the mask, the DeltaKeyer has integrated controls for post-processing of the key and refining the matte. Following is a quick checklist of the primary adjustments to make.
After making the screen selection with the Eyedropper, try the following adjustments to improve the key.
— Adjust the Gain slider to boost the screen color, making it more transparent. This can adversely affect the foreground transparency, so adjust with care.
— Adjust the Balance slider to tint the foreground between the two non-screen colors. For a green screen, this pushes the foreground more toward red or blue, shifting the transparency in the foreground.
Clicking the third of the seven tabs of controls in the DeltaKeyer Inspector opens up a variety of controls for manipulating the matte.
Initial adjustments in the matte tab may include the following parameters:
— Adjust the lower and upper thresholds to increase the density in black and white areas.
— Very subtly adjust the Clean Foreground and Clean Background sliders to fill small holes in the black and white matte. The more you increase these parameters, the more harsh the edges of your matte become.
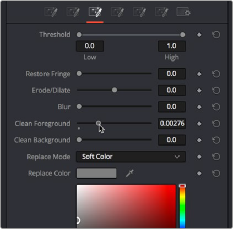
Adjusting the Clean Foreground slider in the Matte panel of the DeltaKeyer controls
In this case, raising the Clean Foreground slider a bit eliminates the inner fringing we don’t want, without noticeably compromising the edges of the key.


![]()
The original key (left), and the key after using the Clean Foreground slider (right)
With this accomplished, we’re happy with the key, so we load the Merge1 node back into the viewer, and press C to set the Color control of the viewer back to RGB. We can see the graphic in the background, but right now it’s too small to cover the whole frame, so we need to make another adjustment.

The final key is good, but now we need to work on the background