< Previous | Contents | Next >
The DeltaKeyer can handle any screen color that may bounce off the background and land on your subject. This bounce screen light is called spill. However, instead of using one node to handle the matte creation and the spill correction, consider disabling this in the DeltaKeyer and remove the spill using a separate color correction node.
To disable spill suppression in the DeltaKeyer, do the following.
— Select the matte tab in the Inspector.
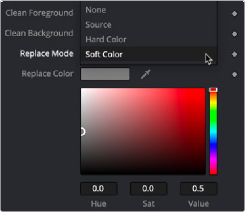
— From the Replace Mode drop-down menu, choose Source. This uses the color from the original source image, effectively disabling any spill correction in the DeltaKeyer.
The Replace Mode menu determines how spill suppression is handled in the DeltaKeyer
![]()
Spill can now be handled using a color correction node placed directly after the DeltaKeyer or branched from the original MediaIn or Loader node and combined with a MatteControl.
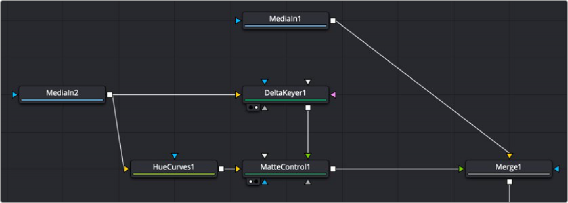
Branching the original image with one branch for the DeltaKeyer and a second for color correction
Masking a Graphic
Next, it’s time to work on the top video track: the news graphic that will appear to the left of the newscaster. The graphic we will use is actually a sheet of different logos, so we need to cut one out using a mask and position it into place.
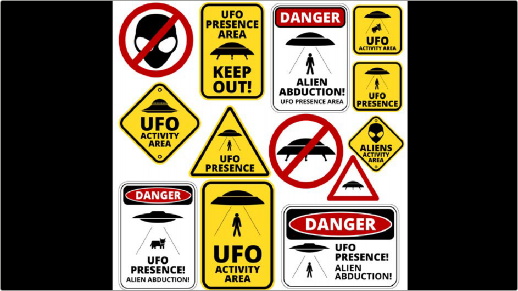
A graphic of multiple logos that must be cropped down to isolate just one
The easiest way to crop a MediaIn or Loader node is to add one of the mask shapes from the toolbar directly to it. Selecting the MediaIn or Loader node and clicking the Rectangle mask from the toolbar will crop, or mask off, the graphic.

Masking the logo using a Rectangle mask connected directly to a Merge node
![]()
Now, all we need to do is to use the onscreen controls of the Rectangle mask to crop the area we want to use, dragging the position of the mask using the center handle, and resizing it by dragging the top/bottom and left/right handles of the outer border.
As an extra bonus, you can take care of rounded corners when masking a graphic by using the Corner Radius slider in the Inspector controls for the Rectangle mask to add the same kind of rounding.
Moving and resizing the mask to fit our logo, and rounding the edges using the Corner Radius Inspector control
For a simple over-the-shoulder graphic, masking the image may be all you need to do, but masking an image does not change the actual dimensions of the graphic. It only changes the area you see. So, accurately positioning the graphic based on the center of the composite becomes more difficult, and any type of match moving would give incorrect results because the graphic has a different resolution than the background. To fix this resolution mismatch, you can place a Crop node after the MediaIn to change the actual dimensions of the graphic layer.

Adding a Crop node after the masked MediaIn to center the cropped logo on the background
With the Crop node selected, the viewer toolbar includes a Crop tool.

Selecting the crop tool in the viewer toolbar
![]()
You can crop the image by dragging a bounding box around it. Unlike a mask which creates a small window you view the image through, a crop effectively changes the resolution of the graphic to the crop bounding box size.

NOTE: The Resize, Letterbox, and Scale nodes also change the resolution of an image.
NOTE: The Resize, Letterbox, and Scale nodes also change the resolution of an image.
NOTE: The Resize, Letterbox, and Scale nodes also change the resolution of an image.
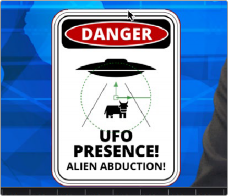
Dragging a bounding box using the Crop tool (left), and the cropped logo now centered on the frame (right)
At this point, we’re all set to move the logo into place. Because the logo is the foreground input to a Merge, you can select the Merge2 node, load it into the viewer, and use the built-in Center X and Y controls or the oncreen controls to place the logo where you want it and make it a suitable size.

![]()
Placing the logo using the foreground input transform controls of the Merge2 node