< Previous | Contents | Next >
Setting this up requires some configuration of the nodes. The Background node must be fully transparent and, unless you are doing something simple like using the Stroke tool set to Color to paint over an image, you must drag the image you want to clone or smudge into the Source Tool field in the Paint node’s inspector. These steps are described in more detail later in this chapter.
Paint Node Workflow
You begin painting by first selecting the paint stroke type from the Paint toolbar above the viewer. There are ten stroke types to choose from as well as two additional tools for selecting and grouping paint strokes. The stroke types and tools are described in detail in Chapter 111, “Paint Node” in the DaVinci Resolve Reference Manual or Chapter 51 in the Fusion Reference Manual. The primary tool for painting and cloning is the Stroke tool. The Stroke tool is a fully animatable and editable vector-based paint stroke and initially uses a duration of the entire global range.
![]()
The Stroke tool is most often used for cloning, beauty work, and creative paint
Select the Correct Paint Stroke Type
Instead of having multiple dedicated Paint nodes for different operations, the procedural nature of Fusion’s Paint tool means there is just one tool with a variety of different stroke types. Each stroke type serves a different purpose. The Paint toolbar above the viewer allows you to choose between different stroke types and drawing tools. These are grouped into a few categories.
![]()
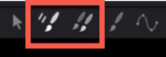
Single-Frame Stroke Types
The Multistroke and Clone Multistroke are explicitly designed for single-frame retouching paint jobs like removing raindrops in a shot that’s supposed to be a sunny day or removing scratch marks and dust when restoring vintage content. When handling these types of jobs, these two Multistroke options are faster than the other stroke types, but they’re not editable later on. This means you must set up the size and function of the brush as well as the duration for the paint stroke before you paint.
The duration of each of these stoke types is one frame by default, but this can be changed using the Stroke Duration slider in the Inspector. Multistroke and Clone MultiStroke are basically the same tools, except Clone Multistroke automatically configures the tool for cloning. In contrast, the Multistroke requires you to set up the tool for cloning manually.
The Multistroke and Clone Multistroke are non-editable single frame stroke types
Editable Stroke Types
The Stroke and Polyline are similar in that they can be modified and animated at any time. Also, they both begin with a duration lasting the entire comp, but that also can be changed using the Keyframes Editor.
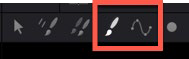
The Stroke and Polyline strokes are editable and last for the entire comp
One of the most flexible editable stroke types you’ll use for many tasks is the Stroke, because it is fully animatable and editable. You can animate all elements of the Stroke, and you can use the Write-on/ Write-off parameters to control how the stroke appears onscreen. You can also connect to a tracker from the Center point of the Stroke if you want to make the stroke follow specific onscreen motion.
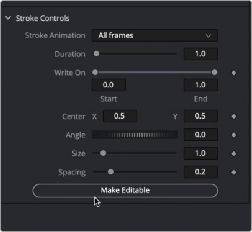
By default, the Stroke type does not expose control points for the shape of the path. You can move and track the center and rotation of the Stroke, but the individual control points that create the spline are hidden. To reveal the control points, you can open the Stroke Controls at the bottom of the Inspector and click the Make Editable button.
![]()
The Stroke’s control points can be revealed using the Make Editable button
Although the Stroke type is the most flexible, that flexibility can come at a performance penalty if you’re painting hundreds of strokes on a frame. For larger numbers of strokes that do not need to be animated, it’s better to use Multistroke or Clone Multistroke, as these are more processor efficient.
The Polyline Stroke acts more like a drawing tool than a paintbrush. It includes the same functionality as the Stroke tool, except that it is created not by dragging or “painting” like a paintbrush, but by clicking to create a spline path, as you do with masks and motion paths. Without even creating a stroke in the viewer, the Polyline Stroke can connect to existing polylines like a mask or a motion path.
If a motion path is published, right-clicking on the Shape Animation label at the bottom of the Polyline Stroke’s Stroke Controls allows you to use the Connect To menu to assume the shape of a motion path or mask. You can also use this method if you import SVG graphics and want to “paint-on” the outlines.
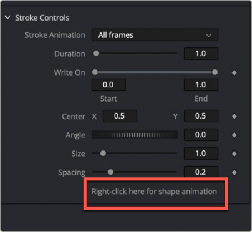
The Polyline Stroke Shape Animation label
Shape Drawing Tools
Five shape-based drawing tools allow you to draw shapes and either fill them with a color or clone an area from a source image. All these tools act similarly to the Stroke and Polyline stroke type in that they are editable at any time and have a default duration spanning the entire global range of the comp. However, you can edit the duration at any time in the Keyframes Editor.

The Shape Strokes are used to create shapes or clone areas based on shapes
![]()
All of the Copy [Shape Name] stroke types require that you connect the source node you are cloning from into the Paint node, and set the Fill Type menu to Image.
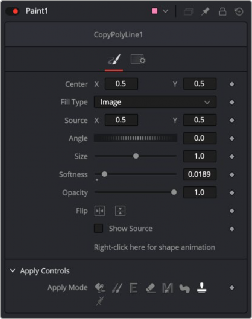
The Copy Shapes require a Source to be directly connected to the Paint tool and set to Image