< Previous | Contents | Next >
Use the onscreen controls, or in the Modifiers tab, right-click over the Paint Group’s Center X label to connect the tracker
Using the Planar Tracker with the Paint Tool
![]()
Here’s an example that dives deeper into a workflow where we use the Paint tool with the Planar Tracker for retouching a clip. We’ll eliminate some facial scars on an actor’s forehead in a commercial by combining the Paint node with the PlanarTracker node, illustrating a common way of using these two powerful tools together.
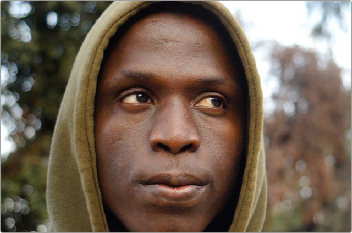
The actor has some scars on his forehead that the director would like painted out
Because this is a clip in motion, we can’t just paint out the scars on the man’s forehead; we need to deal with the motion so that the paint work we do stays put on his face. In this case, a common workflow is to analyze the motion in the image and use it to apply a “steady” operation, pinning down the area we want to paint in place so we can paint on an unmoving surface.
Setting Up the Planar Tracker for Stabilization
The best way to do this is to use the Planar Tracker, so we’ll add the PlanarTracker node after the MediaIn1 node, such that the image connects to the background input of the PlanarTracker node. As always, it’s important to be careful about which input you connect for the effect to work properly.
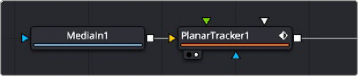
Adding a PlanarTracker node to analyze and steady the part of the image we want to paint on
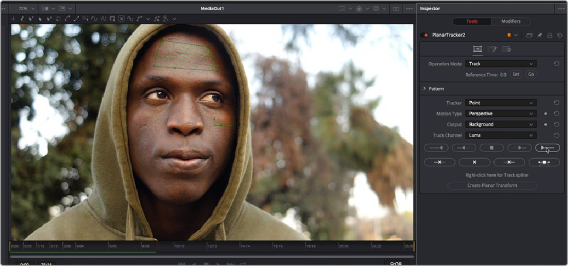
With the PlanarTracker node selected and loaded in the viewer, a viewer toolbar appears with a variety of tools for drawing shapes and manipulating tracking data. The Planar Tracker works by tracking flat surfaces that you define by drawing a shape around the feature you want to track. When you first create a PlanarTracker node, you can immediately begin drawing a shape, so in this case, we draw a simple polygon over the man’s forehead since that’s the feature we want to steady in preparation for painting.
![]()
We draw a simple box by clicking once each on each corner of the man’s forehead to create control points, and then clicking the first one we created to close the shape.
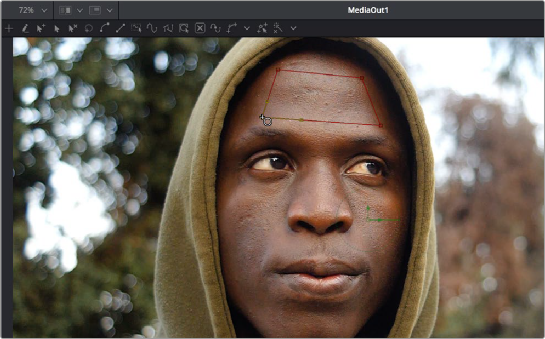
Drawing a shape over the man’s forehead to prepare for Planar Tracking
In the Inspector, the PlanarTracker node has tracking transport controls that are similar to those of the Tracker. However, there are two buttons, Set and Go, underneath the Operation Mode menu, which defaults to Track, since that’s the first thing we need to do. The Set button lets you choose which frame to use as the “reference frame” for tracking, so you click the Set button first before clicking the Track Forward button below.
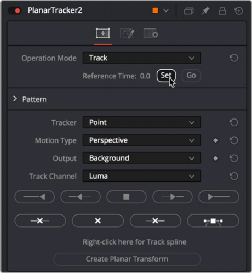
Setting a reference frame at the beginning of the range of frames we want to track

TIP: The Set button lets you supervise a Planar Track in progress and stop it if you see it slipping, making adjustments as necessary before clicking Set at the new frame to set a new reference before continuing to track forward towards the end of the clip.
TIP: The Set button lets you supervise a Planar Track in progress and stop it if you see it slipping, making adjustments as necessary before clicking Set at the new frame to set a new reference before continuing to track forward towards the end of the clip.
TIP: The Set button lets you supervise a Planar Track in progress and stop it if you see it slipping, making adjustments as necessary before clicking Set at the new frame to set a new reference before continuing to track forward towards the end of the clip.
The Pattern controls let you set up how you want to handle the analysis. Of these controls, the Motion Type menu is perhaps the most important. In this particular case, Perspective tracking is the analysis we want. Still, in other situations, you may find you get better results with the Translation, Translation/ Rotation, and Translation/Rotation/Scale options.
![]()
Once you initiate the track, a series of dots appears within the track region shape you created to indicate trackable pixels found. A green progress bar at the bottom of the Timeline ruler lets you see how much of the shot is remaining to track.
Clicking the Track from First Frame button to set the Planar Track in progress; green dots on the image and a green progress bar let you know the track is happening

NOTE: If nothing happens when you track, or it starts to track and then stops, that’s your cue that there isn’t enough trackable detail within the shape you’ve drawn for the Planar Tracker to work, and your best bet is to choose a different location of the image to track.
NOTE: If nothing happens when you track, or it starts to track and then stops, that’s your cue that there isn’t enough trackable detail within the shape you’ve drawn for the Planar Tracker to work, and your best bet is to choose a different location of the image to track.
NOTE: If nothing happens when you track, or it starts to track and then stops, that’s your cue that there isn’t enough trackable detail within the shape you’ve drawn for the Planar Tracker to work, and your best bet is to choose a different location of the image to track.
Once the track is complete, you can set the Operation Mode of the PlanarTracker node’s controls in the Inspector to Steady.
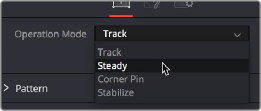
Setting the PlanarTracker node to Steady
![]()
You’ll immediately see the image warped as much as is necessary to pin the tracked region in place for whatever operation you want to perform. If you scrub through the clip, you should see that the image dynamically cornerpin-warps as much as is necessary to keep the forehead region within the shape you drew pinned in place. In this case, this sets up the man’s head as a canvas for paint.
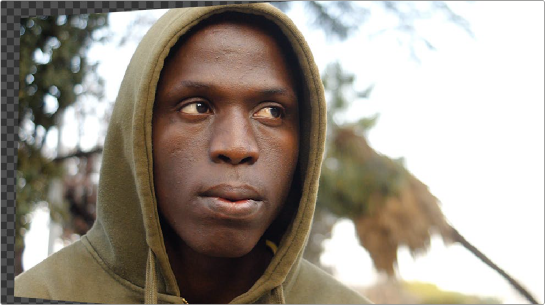
Steadying the image results in warping as the forehead is pinned in place for painting
At this point, you’re ready to paint out those scars.
Connecting the Paint Node
Although you could paint directly on the image by connecting the Paint node after the Planar Tracker, it gives you more control over the process if you merge the Paint node over the top of the steadied image. To do that, you’ll add a Merge after the Planar Tracker and then connect a Background node into the foreground of the Merge. Insert a Paint node after the background, and you are ready for this process.
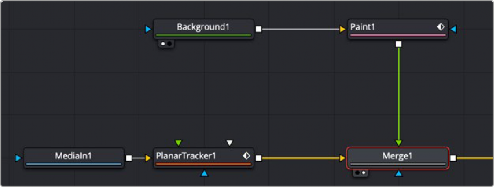
Paint node merged over the top of a steadied Planar Tracker
The Background node must be fully transparent; otherwise, you are painting on the solid color instead of the Merge background image. To make the background transparent, drag the Alpha channel sidebar all the way up in the Color Picker.
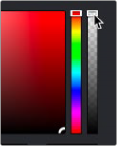
The Color Picker in the Background node set to be transparent
![]()
With the Paint node selected and set up, the next thing we want to do is to select the Stroke tool. The Stroke tool is the tool of choice when you want to paint out features or paint in fixes to subjects within the frame that need to remain in place for the entire shot.
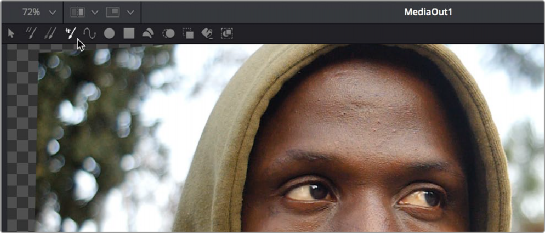
Choosing the Stroke tool from the Paint node’s tools in the viewer toolbar
Next, choose the Clone mode from the Apply Controls. In this example, we’ll clone part of the man’s face over the scars to get rid of them. Choosing the Clone mode switches the controls of the Paint node to those used for cloning.

Choosing the Clone mode in the Inspector
![]()
The Paint node clones from the connected Input image unless you instruct it otherwise. If you are just painting a color over the background image, then you are good to go. However, if you plan on using the merge’s steadied background image for cloning with the Paint tool, you must set that image as the Paint node’s source. To set the clone source for the Paint node, you drag the PlanarTracker node into the Source Tool field in the Inspector.
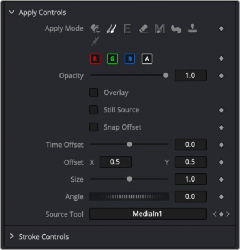
Any node can be dragged into the Source Tool field when cloning with the Paint tool
With the Stroke tool selected in the Paint toolbar, the Clone mode selected in the Inspector controls, and the Source for cloning added to the Source Tool field, we’re ready to start painting. If we move the pointer over the viewer, a circle shows us the paint tool, ready to go.