< Previous | Contents | Next >
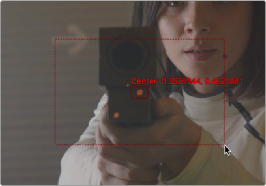
A second rectangle with a dotted border surrounds the pattern box. This is the search area. When progressing from one frame to another while tracking, the Tracker analyzes the region defined
by the search area, which surrounds the last known tracker position in an attempt to relocate the pattern. The larger the search area, the better chance you have of successfully tracking fast moving objects, but the longer the track will take. However, there are some ways to optimize tracking for specific content.
For example, tracking a pattern that is moving quickly across the screen from left to right requires a wide search area but does not require a very tall one, since all movement is horizontal. If the search area is smaller than the movement of the pattern from one frame to the next, the Tracker will likely fail and start tracking the wrong pixels, so it’s important to take the speed and direction of the motion into consideration when setting the search area.
![]()
You can resize the search area by dragging the edges of the dotted outline
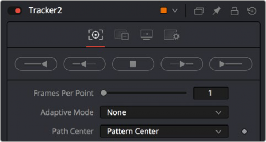
Perform the Track Analysis
Before you begin analyzing, you’ll need to make sure you’ve set a render range in the Time Ruler that corresponds to the range of frames during which the pattern is visible. This may be an entire clip or only a small portion of that clip. Depending on the type of motion you’re tracking, you may want to use the Adaptive Mode option to aid the analysis (see below for more details).
Once your options are set, you can use any of the tracking transport buttons at the top of the Inspector to start tracking. Once tracking has started, you cannot work in the Node Editor until it has completed.