< Previous | Contents | Next >
The tracking transport buttons and analysis parameters
— Click the Track Reverse button to track from the very end of the render range.
— Click the Track Backward from Current Frame button to track backward from the current playhead position.
— Click the Track Forward button to track from the very start of the render range.
— Click the Track Forward from Current Frame button to track forward from the current playhead position.
Pattern tracking will stop automatically when it reaches the end of the render range (or the start when tracking backward), but you can also interrupt it and stop tracking at any time.
— Click the Stop Tracking button in the tracker transports.
— Click Stop Render at the bottom of the Fusion window.
— Press the Escape key.
![]()
When tracking is complete, the path will be connected to the pattern. The path from that pattern can now be connected to another node or used for more advanced operations like stabilization and corner positioning.
Once the track is complete, assuming it’s good, you can use the various techniques in this chapter to use the track in your composition.
Tips for Choosing a Good Pattern
The Tracker works by searching each frame for the pixels contained in the pattern. In order for a track to be successful, a fairly high contrast and unique region of the image must be located in the footage. This process is known as pattern selection.
The first step in pattern selection is to review the footage to be tracked several times. Watch for candidate patterns that are visible through the entire range of frames, where the contrast is high and the shape of the pattern does not change over time. The more unique the pattern, the more likely the track is to be successful.
In addition to locating high contrast, defined patterns, watch for the frames where the pattern moves the most. Identifying the maximum range of a pattern’s motion will help to determine the correct size for the pattern search area.
It is not uncommon to have a scene that requires the use of several different patterns to generate a single path. This most often occurs because the pattern moves out of frame or is temporarily obscured by another scene element. Combining patterns into a single pattern is described later in the chapter.
Selecting the Pattern’s Image Channels
When a pattern of pixels is selected, the Tracker automatically selects the color channel used for tracking the pattern based on an analysis of each channel for contrast, clarity, and reliability. The channels selected are highlighted in the bars to the right of the Pattern display window in the node controls.
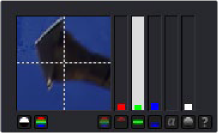
Highlighted channel bars indicate which channel is selected for tracking
You can override the automatic channel selection by clicking the buttons beneath the bars for each channel to determine the channel used for tracking.
You can choose any one of the color channels, the luminance channels, or the alpha channel to track a pattern.
![]()
When choosing a channel, the goal is to choose the cleanest, highest contrast channel for use in the track. Channels that contain large amounts of grain or noise should be avoided. Bright objects against dark backgrounds often track best using the luminance channel.
Selecting patterns for stabilization can be a tricky business. The location of the pattern, when it is selected, is used to determine precisely how the image will be stabilized. At least two patterns are required to correct for rotation; using three patterns will correct for scaling, and more will usually improve the quality of the solution.
Try not to select just any potentially valid pattern in the sequence, as some patterns will make the solution worse rather than better. To help with your selection, use the following guidelines when selecting patterns for stabilization.
— Locate patterns at the same relative depth in the image. Objects further in the background will move in greater amounts compared to objects in the foreground due to perspective distortion. This can confuse the stabilization calculations, which do not compensate for depth.
— Locate patterns that are fixed in position relative to each other. Patterns should not be capable of moving with reference to each other. The four corners of a sign would be excellent candidates,
while the faces of two different people in the scene would be extremely poor choices for patterns.