< Previous | Contents | Next >
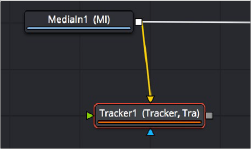
Next, we’ll drag a connection from the MediaIn1 node to the Tracker1 node to automatically connect the source clip to the Tracker1 background input. This branches the output from the MediaIn1 node to the Tracker node so that the Tracker1 node processes the image separately from the rest of the node tree. This is not required, but it’s a nice organizational way to see that the Tracker node is doing an analysis that must be referred to in a way other than a “physical” connection.
Branching a Tracker node to use to analyze an image
A Simple Tracking Workflow
The Tracker node is the simplest tracking operation the Fusion page has, and while there are several ways of using it, an extremely common workflow is to use the Tracker node controls to analyze the motion of a subject in the frame with motion you want to follow, and then use the resulting motion path data by “connecting” it to the Center parameter of another node that’s capable of transforming the image you want to match move.
Positioning the Tracker Onscreen Control
![]()
When the Tracker node is selected, a single green box appears in the viewer, which is the default onscreen control for the first default tracker that node contains (seen in the Tracker List of the Inspector controls). Keep in mind that you only see onscreen controls for nodes that are selected, so if you don’t see the onscreen tracker controls, you know you need to select the tracker you want to work with. Loading the tracker you want to work with into the viewer is also the safest way to make sure you’re positioning the controls correctly relative to the actual image that you’re tracking.
If you position your pointer over this box, the entire onscreen control for that tracker appears, and if you click the onscreen control to select that tracker, it turns red. As with so many other tracker interfaces you’ve likely used, this consists of two boxes with various handles for moving and resizing them:
— The inner box is the “pattern box,” which identifies the “pattern” in the image you’re tracking and want to follow the motion of. The pattern box has a tiny handle at its upper-left corner that you use to drag the box to overlap whatever you want to track. You can also resize this box by dragging any corner, or you can squish or stretch the box by dragging any edge to make the box better fit the size of the pattern you’re trying to track. The center position of the tracker is indicated via X and Y coordinates.
— The outer box is the “search box,” which identifies how much of the image the tracker needs to analyze to follow the motion of the pattern. If you have a slow-moving image, then the default search box size is probably fine. However, if you have a fast-moving image, you may need to resize the search box (using the same kind of corner and side handles) to search a larger area, at the expense of a longer analysis. The name of that tracker is shown at the bottom right of the search box.
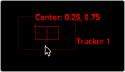
The onscreen controls of a selected tracker seen in isolation
It’s worth saying a second time that the handle for moving a tracker’s onscreen control is a tiny dot at the upper-left corner of the inner pattern box. It’s really easy to miss if you’re new to Fusion. You must click on this dot to drag the tracker around.
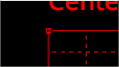
The handle for dragging the tracker boxes to move them around
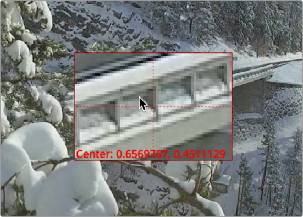
In this example, we’ll drag the onscreen control so the pattern box overlaps a section of the bridge right over the leftmost support. As we drag the onscreen control, we see a zoomed-in representation of the part of the image we’re dragging over to help us position the tracker with greater precision. For this example, the default sizes of the pattern and search box are fine as is.
![]()
The zoomed-in preview that helps you position the pattern box as you drag it
Using the Tracker’s Inspector Controls to Perform the Analysis
At this point, let’s look at the Tracker node’s controls in the Inspector. There are a lot of controls, but for this simple example we only care about the main Tracker panel, with the tracking analysis buttons at the top, the tracking options below those, and the Tracker List underneath those. The Tracker List also has buttons for adding and deleting trackers; you have the option of adding multiple trackers that can be analyzed all at once for different workflows, but we don’t need that for now.
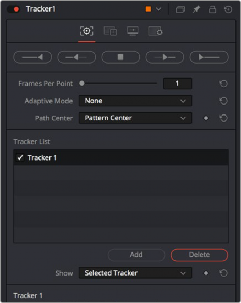
Tracker Inspector controls, with the tracking analysis buttons at top, the tracker options in the middle, and the Tracker List below
Additional controls over each tracker and the image channels being analyzed appear at the bottom, along with offset controls for each tracker, but we don’t need those now (at least not yet).
![]()
Again, this track is so simple that we don’t need to change the default behaviors that much, but because the drone is flying in a circular pattern, the shape of the pattern area is changing as the clip plays. Fortunately, we can choose Every Frame from the Adaptive Mode menu to instruct the tracker to update the pattern being matched at every frame of the analysis, to account for this.
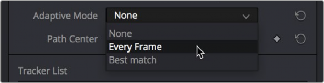
Changing the Adaptive Mode of the Tracker node to Every Frame to account for the camera’s shift of perspective
Now, we just need to use the tracker analysis buttons at the top to begin the analysis. These buttons work like transport controls, letting you start and stop analysis as necessary to deal with problem tracks in various ways. Keep in mind that the first and last buttons, Track from Last Frame and Track from First Frame, always begin a track at the last or first frame of the composition, regardless of the playhead’s current position, so make sure you’ve placed your tracker onscreen controls appropriately at the last or first frame.
![]()
The analysis buttons, left to right: Track from Last Frame, Track Backward, Stop Tracking, Track Forward, Track from First Frame