< Previous | Contents | Next >
Matching the Live-Action Camera
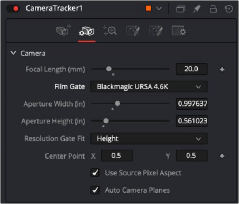
Once you have completed tracking, the next stage of this workflow requires the controls in the Camera tab. This is where you define the actual camera used on set, primarily the film gate size and focal length. This information should have been logged on the set to make available for post-
production. When using camera-original media, you can sometimes locate this information in the file metadata.
— If you are using DaVinci Resolve, select the MediaIn node with the camera clip, open the Metadata Editor, and view the Camera metadata preset.
— If you are using Fusion Studio, display the metadata subview from the viewer toolbar.
If the actual values are not known, try a best guess. The solver attempts to find a camera near these parameters, and it helps the solver by giving parameters as close to the live action as possible. The more accurate the information you provide, the more accurate the solver calculation. At a minimum, try to at least choose the correct camera model from the Film Gate menu. If the film gate is incorrect, the chances that the Camera Tracker correctly calculates the lens focal length become very low.
![]()
The Camera tab in the Camera Tracker tool
Unlike the Track and Solve tabs, the Camera tab does not include a button at the top of the Inspector that executes the process. There is no process to perform on the Camera tab once you configure the camera settings. After you set the camera settings to match the live-action camera, you move to the Solve tab.