
< Previous | Contents | Next >
The Catcher node
Catcher Node Overview
The Catcher material is used to “catch” texture-mode projections cast from Projector 3D and Camera 3D nodes. The intercepted projections are converted into a texture map and applied by the Catcher material to the geometry to which it is connected.
To understand the Catcher node, it helps to understand the difference between light-based projections and texture-based projections. Choosing Light from the projection mode menu on the Projector 3D or Camera 3D nodes simply adds the values of the RGB channels in the projected image to the diffuse texture of any geometry that lies within the projection cone. This makes it impossible to clip away geometry based on the Alpha channel of an image when using light mode projections.
Imagine a scenario where you want to project an image of a building onto an image plane as part of a set extension shot. You first rotoscope the image to mask out the windows. This makes it possible to see the geometry of the rooms behind the wall in the final composite. When this image is projected as light, the Alpha channel is ignored, so the masked windows remain opaque.
![]()
By connecting the Catcher to the diffuse texture map of the material applied to the image plane, and then switching the projection mode menu in the Projector 3D or Camera 3D node from Light or Ambient Light mode to Texture mode, the projected image is applied as a texture map. When using this technique for the example above, the windows would become transparent, and it would be possible to see the geometry behind the window.

NOTE: The Catcher material requires a Projector 3D or Camera 3D node in the scene, set to project an image in Texture mode on the object to which the Catcher is connected. Without a projection, or if the projection is not set to Texture mode, the Catcher simply makes the object transparent and invisible.
NOTE: The Catcher material requires a Projector 3D or Camera 3D node in the scene, set to project an image in Texture mode on the object to which the Catcher is connected. Without a projection, or if the projection is not set to Texture mode, the Catcher simply makes the object transparent and invisible.
NOTE: The Catcher material requires a Projector 3D or Camera 3D node in the scene, set to project an image in Texture mode on the object to which the Catcher is connected. Without a projection, or if the projection is not set to Texture mode, the Catcher simply makes the object transparent and invisible.
The main advantages of this approach over light projection are that the Catcher can be used to project Alpha onto an object, and it doesn‘t require lighting to be enabled. Another advantage is that the Catcher is not restricted to the diffuse input of a material, making it possible to project specular intensity maps, or even reflection and refraction maps.
Inputs
The Catcher node has no inputs. The output of the node is connected to the diffuse color material input of the Blinn, Cook Torrance, or other material node applied to the 3D geometry.
Basic Node Setup
The output of a Catcher node should be connected to the material input of your 3D geometry node. A camera is set up as a proctor with an image connected to the camera’s image input. When the camera is set to texture projection mode, the Catcher node is used to determine which geometry receives the texture.
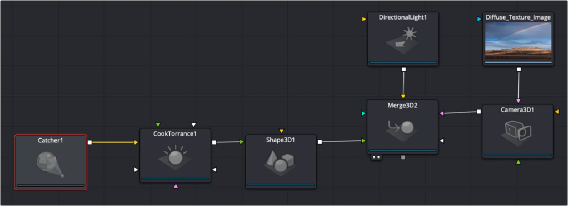
A Catcher node output is connected to the input of the geometry node that receives the texture projection
Inspector

![]()
Catcher controls
Controls Tab
The Options in the Controls tab determine how the Catcher handles the accumulation of multiple projections.
Use this checkbox to enable or disable the node. This is not the same as the red switch in the upper- left corner of the Inspector. The red switch disables the tool altogether and passes the image on without any modification. The Enable checkbox is limited to the effect part of the tool. Other parts, like scripts in the Settings tab, still process as normal.
The Color mode menu is used to control how the Catcher combines the light from multiple projectors.
It has no effect on the results when only one projector is in the scene. This control is designed to work with the software renderer in the Renderer 3D node and has no effect when using the OpenGL renderer.