< Previous | Contents | Next >
You control this transformation by using pop-up menus to define the Illuminant Type of the source (typically the color temperature the camera was set to) and that of the target that you want to transform the image to. For both sets of controls, you can choose a Standard Illuminant from a list, a Color Temperature via a slider, or CIE 1931 xy coordinate values. This image transform is extremely precise because the image is first transformed from the Timeline Color Space to XYZ, and then it’s transformed to match the LMS (long, medium, short) color space that models the cone response of the human eye to colors lit by different illuminants.
This node also takes into account the current color space and gamma of the clip, which default to those set for the current timeline. If you wish to change these values, you can do so using the Color Space and Gamma menus.
Common Controls
The Settings tab in the Inspector is also duplicated in other Color nodes. These common controls are described in detail at the end of this chapter in “The Common Controls” section.
Color Space Transform [CSt]
![]()
The Color Space Transform node
Color Space Transform Node Introduction
A simple node that lets you perform the kind of color transforms that LUTs do, but instead of using lookup tables, this plugin uses the same math used by Resolve Color Management (RCM) in order to do extremely clean color transforms without clipping.
Inputs
The two inputs on the Color Space Transform node are the input and effect mask.
— Input: The orange input connects the primary 2D image for the auto gain.
— Effect Mask: The blue input is for a mask shape created by polylines, basic primitive shapes, paint strokes, or bitmaps from other tools. Connecting a mask to this input limits the adjustment to only those pixels within the mask. An effect mask is applied to the tool after the tool is processed.
Basic Node Setup
The Color Space Transform node, like many 2D image-processing nodes, receives a 2D image like a Loader node or the MediaIn1 shown below. The output continues the node tree by connecting to another 2D image-processing node or a Merge node.
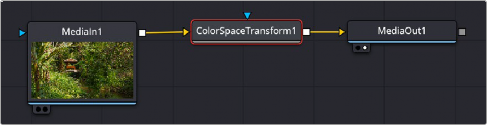
A Color Space Transform node applied to a MediaIn1 node
![]()
Inspector
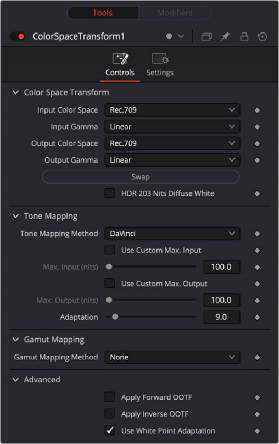
Color Space Transform controls
Controls Tab
The Controls tab contains the primary controls necessary for performing the Color Space Transform on the input.
Exposes four pop-up menus that let you set an Input Colorspace, Input Gamma, Output Colorspace, and Output Gamma, in order to do controlled transforms from the Input settings to the Output settings, right within a node. The Swap button lets you quickly reverse the color and gamma space conversion.
Tone Mapping lets you enable tone mapping to accommodate workflows where you need to transform one color space into another with a dramatically larger or smaller dynamic range by automating an expansion or contraction of image contrast in such a way as to give a pleasing result with no clipping.
— None: This setting disables Input DRT Tone Mapping. No tone mapping is applied to the
Input to Timeline Color Space conversion at all, resulting in a simple 1:1 mapping to the Timeline Color Space.
— Clip: Hard clips all out-of-bounds values.
— Simple: Uses a simple curve to perform this transformation, compressing or expanding the highlights and/or shadows of the timeline dynamic range to better fit the output dynamic range. Note that the “Simple” option maps between approximately 5500 nits and 100 nits, so if you’re mapping from an HDR source with more than 5500 nits to an SDR destination there may still be some clipping of the highlights above 5500 nits.
— Luminance Mapping: Same as DaVinci, but more accurate when the Input Color Space of all your media is in a single standards-based color space, such as Rec. 709 or Rec. 2020.
— DaVinci: This option tone maps the transform with a smooth luminance roll-off in the shadows and highlights, and controlled desaturation of image values in the very brightest and darkest parts of the image. This setting is particularly useful for wide-gamut camera media and is a good setting to use when mixing media from different cameras.
![]()
— Saturation Preserving: This option has a smooth luminance roll-off in the shadows and highlights but does so without desaturating dark shadows and bright highlights, so this is an effective option for colorists who like to push color harder. However, because over-saturation in the highlights of the image can look unnatural, two parameters are exposed to provide some user-adjustable automated desaturation.
— Sat. Rolloff Start: Lets you set a threshold, in nits (cd/m2), at which saturation will roll off along with highlight luminance. Beginning of the rolloff.
— Sat. Rolloff Limit: Lets you set a threshold, in nits (cd/m2), at which the image will be totally desaturated. End of the rolloff.
— Use Custom Max Input/Output: Checking these boxes and adjusting the slider below allows you to specify the minimum and maximum luminance of the input image in nits. Using these two sliders together, you can set which value from the Input Gamma is mapped to which value of the Output Gamma.
— Adaptation: Used to compensate for large differences in the viewer’s state of visual adaptation when viewing a bright image on an HDR display versus seeing that same image on an SDR display. For most “average” images this setting works best set between 0–10. However, when you’re converting very bright images (for example, a snow scene at noon), then using a higher value will yield more image detail within the highlights.
Gamut Mapping Method accommodates workflows where you need to transform one color space into another with a dramatically larger or smaller gamut by helping to automate an expansion or contraction of image saturation in such a way as to give a pleasing and naturalistic result with no clipping.
— None: results in no Gamut mapping at all.
— Saturation Mapping: Enables saturation mapping to fit the range of saturation values from the Input Color Space and Gamma into the Output Color Space and Gamma. It enables the Saturation Knee and Saturation Max. controls.
— The Saturation Knee slider sets the image level at which saturation mapping begins. Below this level, no remapping is applied. All saturation values from this level on up are remapped according to the Saturation Max. slider. A value of 1.0 is maximum saturation in the currently selected output color space.
— The Saturation Max. slider sets the new maximum level to which you want to either raise or lower all saturation values that are above the Saturation Knee setting. A value of 1.0 is maximum saturation in the currently selected output color space.

NOTE: While this node has ACES settings, it does transforms to the ACES color space colormetrically, which is not actually correct for ACES workflows. For actual ACES workflows, use the ACES Transform node, which uses transforms specified by the Academy.
NOTE: While this node has ACES settings, it does transforms to the ACES color space colormetrically, which is not actually correct for ACES workflows. For actual ACES workflows, use the ACES Transform node, which uses transforms specified by the Academy.
NOTE: While this node has ACES settings, it does transforms to the ACES color space colormetrically, which is not actually correct for ACES workflows. For actual ACES workflows, use the ACES Transform node, which uses transforms specified by the Academy.
— Clip: Hard clips all out-of-gamut values.
This drop-down menu exposes the advanced features of the Color Space Transform node.
![]()
— Apply Forward OOTF: Check this box to convert the image from scene referred to display referred color management.
— Apply Inverse OOTF: Check this box to convert the image from display referred to scene referred color management.
— Use White Point Adaptation: Applies a chromatic adaptation transform to account for different white points between color spaces.
— Uncheck this box if you simply want to view the input color space’s white point unaltered in the output color space. For example, wanting to use a P3-D60 mastered clip inside a P3-D65 timeline for reference purposes.
— Check this box to apply the chromatic adaptation transform to convert the input white point to match the output color space’s white point. For example, wanting a P3-D60 mastered clip to cut in with other clips mastered in a P3-D65 timeline.
Common Controls
The Settings tab in the Inspector is also duplicated in other Color nodes. These common controls are described in detail at the end of this chapter in “The Common Controls” section.