< Previous | Contents | Next >
The Brightness Contrast node
Brightness Contrast Node Introduction
The Brightness Contrast node adjusts the gain, brightness, contrast, gamma, and saturation of an image. The order of the controls represents the order in which the operations are applied.
For example, gamma gets applied before contrast but after gain. The Brightness Contrast is also reversible using the Forward and Reverse buttons. So color corrections, once applied, can be reversed further downstream.
For this to work best, image processing should operate in 32-bit floating point.
Inputs
The two inputs on the Brightness Contrast node are the input and effect mask.
— Input: The orange input connects the primary 2D image for the brightness contrast.
![]()
— Effect Mask: The blue input is for a mask shape created by polylines, basic primitive shapes, paint strokes, or bitmaps from other tools. Connecting a mask to this input limits the Brightness Contrast adjustment to only those pixels within the mask. An effect mask is applied to the tool after the tool is processed.
Basic Node Setup
The Brightness Contrast node, like many 2D image-processing nodes, receives a 2D image like a Loader node or the MediaIn1 shown below. The output continues the node tree by connecting to another 2D image-processing node or a Merge node.
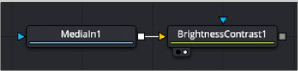
A Brightness Contrast node applied to a MediaIn1 node
Inspector
Brightness Control controls
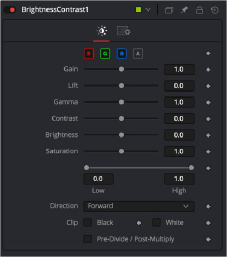
Controls Tab
The Controls tab contains all the primary controls necessary for customizing the brightness, contrast operations.

NOTE: This is not the same as the RGBA checkboxes found under the common controls. The node takes these selections into account before it processes the image, so deselecting a channel causes the node to skip that channel when processing, speeding up the rendering of the effect. In contrast, the channel controls under the Common Controls tab get applied after the node has processed.
NOTE: This is not the same as the RGBA checkboxes found under the common controls. The node takes these selections into account before it processes the image, so deselecting a channel causes the node to skip that channel when processing, speeding up the rendering of the effect. In contrast, the channel controls under the Common Controls tab get applied after the node has processed.
NOTE: This is not the same as the RGBA checkboxes found under the common controls. The node takes these selections into account before it processes the image, so deselecting a channel causes the node to skip that channel when processing, speeding up the rendering of the effect. In contrast, the channel controls under the Common Controls tab get applied after the node has processed.
The filter defaults to operating on R, G, B, and A channels. Selective channel filtering is possible by clicking each channel button to make them active or inactive.
![]()
The gain slider is a multiplier of the pixel value. A Gain of 1.2 makes a pixel that is R0.5 G0.5 B0.4 into R0.6 G0.6, B0.48 (i.e., 0.4 * 1.2 = 0.48) while leaving black pixels unaffected. Gain affects higher values more than it affects lower values, so the effect is most influential in the midrange and top range of the image.
While Gain scales the color values around black, Lift scales the color values around white. The pixel values get multiplied by the value of this control. A Lift of 0.5 makes a pixel that is R0.0 G0.0 B0.0 into R0.5 G0.5, B0.5 while leaving white pixels unaffected. Lift affects lower values more than it affects higher values, so the effect is most influential in the midrange and low range of the image.
Values higher than 1.0 raise the Gamma (mid-gray), whereas lower values decrease it. The effect of this node is not linear, and existing black or white points are not affected at all. Pure gray colors are affected the most.
Contrast is the range of difference between the light to dark areas. Increasing the value of this slider increases the contrast, pushing color from the midrange toward black and white. Reducing the contrast causes the colors in the image to move toward midrange, reducing the difference between the darkest and brightest pixels in the image.
The value of the Brightness slider gets added to the value of each pixel in the image. This control’s effect on an image is linear, so the effect is applied identically to all pixels regardless of value.
Use this control to increase or decrease the amount of Saturation in the image. A saturation of 0 has no color, reducing the image to grayscale.
This range control is similar to the Gain control in some respects. If Low gets anchored at 0.0
and the High value gets reduced from 1.0, the effect is identical to increasing the gain. High values get multiplied by the inverse of the high value. (e.g., if high is 0.75, each pixel is multiplied by 1/0.75, or 1.3333).
Leaving the high anchored at 1.0 and increasing the low is the same as inverting the image colors and increasing the gain and inverting it back again. This pushes more of the image toward black without affecting the whites at all.
![]()
Forward applies all values normally. Reverse effectively inverts all values.
The Clip Black and Clip White checkboxes clip out-of-range color values that can appear in an image when processing in floating-point color depth. Out-of-range colors are below black (0.0) or above white (1.0). These checkboxes have no effect on images processed at 8-bit or 16-bit per channel, as such images cannot have out-of-range values.
Selecting the Pre-Divide/Post-Multiply checkbox causes the image pixel values to be divided by the Alpha values before the color correction, and then re-multiplied by the Alpha value after the correction.
This helps to prevent the creation of illegally additive images when color correcting images with premultiplied Alpha channels.
Common Controls
The Settings tab in the Inspector appears in other Color nodes. These common controls are described in detail at the end of this chapter in “The Common Controls” section.