< Previous | Contents | Next >

The Shader node
Shader Node Introduction
The Shader node can control the lighting, reflection mapping, and 3D shading of elements in a rendered image. The node relies on the presence of the normal map channel in a rendered image. If this channel is not present, this node has no effect.
Inputs
The Shader node includes three inputs: one for the main image with normal map channels, one for a reflection map, and another for an effect mask to limit the area where the depth blur is applied.
— Input: This orange input is the only required connection. It accepts a 2D image that includes a normals channel.
— Reflection Map Image: The green reflection map image input projects an image onto all elements in the scene or to elements selected by the Object and Material ID channels in the Common Controls. Reflection maps work best as 32-bit floating point, equirectangular formatted images
![]()
— Effect Mask: The optional blue effect mask input accepts a mask shape created by polylines, basic primitive shapes, paint strokes, or bitmaps from other tools. Connecting a mask to this input limits the shader to only those pixels within the mask. An effects mask is applied to the tool after the tool is processed.
Basic Node Setup
The Shader node is inserted after a 2D image that contains a Normals channel. Below, a Renderer 3D is used to add a Normals channel to an image. The Shader node uses the normals for refining the surface appearance with a reflection map connected.

The Shader node using normals from a Renderer 3D and a reflection input
Inspector

Shader controls
Controls Tab
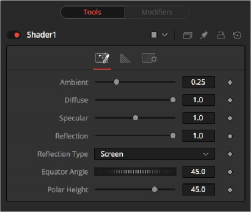
The Controls tab for the Shader node includes parameters for adjusting the overall surface reaction to light sources. You can modify the ambient, diffuse, specular, and reflection properties of the image connected to the orange image input.
The Controls tab includes parameters for basic lighting brightness and reflections.
Ambient controls the Ambient color present in the scene or the selected object. This is a base level of light added to all pixels, even in completely shadowed areas.
![]()
This option controls the Diffuse color present in the scene or for the selected object. This is the normal color of the object, reflected equally in all directions.
This option controls the Specular color present in the scene or for the selected object. This is the color of the glossy highlights reflected toward the eye from a light source.
This option controls the Reflection contribution in the scene or for the selected object. High levels make objects appear mirrored, while low levels overlay subtle reflections giving a polished effect. It has no effect if no reflection map is connected.
This menu determines the type of reflection mapping used to project the image in the second input.
— Screen: Screen causes the reflection map to appear as if it were projected on to a screen behind the point of view.
— Spherical: Spherical causes the reflection map to appear as if it were projected on to a huge sphere around the whole scene.
— Refraction: Refraction causes the reflection map to appear as if it were refracting or distorting according to the geometry in the scene.
Equator Angle controls the left to right angle of the light generated and mapped by the Shader node for the scene or the selected object.
Polar Height controls the top to bottom angle of the light generated and mapped by the Shader node for the scene or the selected object.

Shader tab controls
![]()
Shader Tab
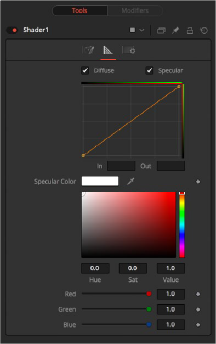
The Shader tab is used to adjust the falloff of the Diffuse and Specular light and the tint color of the specular highlight.
When enabled, these checkboxes allow you to edit the Diffuse and/or Specular Shader curves in the Shader spline window.
These options are used to display and edit point values on the spline.
Use the Diffuse curve to manipulate the diffuse shading and the Specular curve to affect the specular shading. Drag a box over several points to group-select them. Right-clicking displays a menu with options for adjusting the spline curves.
Common Controls
The Settings tab in the Inspector is also duplicated in other Deep Pixel nodes. These common controls are described in detail at the end of this chapter in “The Common Controls” section.