< Previous | Contents | Next >
Defines the right border of the search area of the ADoD. Higher values on this slider move the right border toward the left, excluding more data from the right margin.
1 represents the right border of the image; 0 represents the left border. The slider defaults to 1 (right border).
Defines the top border of the search area of the ADoD. Higher values on this slider move the top border toward the bottom, excluding more data from the top margin.
1 represents the top border of the image; 0 represents the bottom border. The slider defaults to 1 (top border).
Common Controls
The Settings tab in the Inspector is also duplicated in other miscellaneous nodes. These common controls are described in detail at the end of this chapter in “The Common Controls” section.
Change Depth [CD]
![]()
The Change Depth node
Change Depth Node Introduction
The Change Depth node has one simple use, and that is to change the bits per color channel used to process a node. This node is often used after color correcting 32-bit floating-point image files, converting them from float processing to 16-bit per channel to preserve memory and performance.
It can also be useful if, from a certain point in your node tree, you feel the need to process your images in a higher bit depth than their original one or to reduce the bit depth to save memory.
Inputs
The single input on the Change Depth node is used to connect a 2D image and an effect mask, which can be used to limit the blurred area.
— Input: The orange input is used for the primary 2D image to be converted.
— Effect Mask: The blue input is for a mask shape created by polylines, basic primitive shapes, paint strokes or bitmaps from other tools. Connecting a mask to this input limits the blur to only those pixels within the mask.
Basic Node Setup
Below, a Loader node in Fusion Studio is color corrected and then down converted from a floating- point image to a 16-bit image to save image-processing time and memory.

A Change Depth node placed after color correction is done on a floating-point image.
Inspector
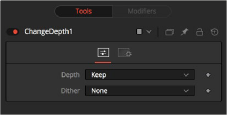
The Change Depth Controls tab
Controls Tab
The two controls for this node are the Depth menu and the Dither menu. These two menus are used to convert and adjust the color depth of the image.
![]()
The Keep setting doesn‘t do anything to the image but instead keeps the input depth. The other options change the bit depth of the image to the respective value.
When down converting from a higher bit depth, it can be useful to add Error Diffusion or Additive Noise to camouflage artifacts that result from problematic (high-contrast) areas.
Common Controls
The Settings tab in the Inspector is also duplicated in other miscellaneous nodes. These common controls are described in detail at the end of this chapter in “The Common Controls” section.