< Previous | Contents | Next >
— Auto: Automatically reads and passes on the metadata that may be in the image.
— Space: Displays a Gamma Space Type menu where you can choose the correct gamma curve of the image.
— Log: Brings up the Log/Lin settings, similar to the Cineon tool. For more information,
see Chapter 98, "Film Nodes." in the DaVinci Resolve Reference Manual, or Chapter 37 in the Fusion Reference Manual.
Depending on the selected Gamma Space or on the Gamma Space found in Auto mode, the Gamma Curve is removed from, or a log-lin conversion is performed on, the material, effectively converting it to a linear output space.

NOTE: Motion Blur on 3D mode particles (rendered with a Renderer 3D) also requires that identical motion blur settings are applied to the Renderer 3D node.
NOTE: Motion Blur on 3D mode particles (rendered with a Renderer 3D) also requires that identical motion blur settings are applied to the Renderer 3D node.
NOTE: Motion Blur on 3D mode particles (rendered with a Renderer 3D) also requires that identical motion blur settings are applied to the Renderer 3D node.
As with other 2D nodes in Fusion, Motion Blur is enabled from within the Settings tab. You may set Quality, Shutter Angle, Sample Center, and Bias, and Blur will be applied to all moving particles.
pSpawn [pSp]

![]()
The pSpawn node
pSpawn Node Introduction
The pSpawn node makes each affected particle act as an emitter that can produce one or more particles of its own. The original particle continues until the end of its lifespan, and each of the particles it emits becomes wholly independent with a lifespan and properties of its own.
As long as a particle falls under the effect of the pSpawn node, it will continue to generate particles. It is important to restrict the effect of the node with limiters like Start and End Age, Probability, Sets and Regions, and by animating the parameters of the emitter so that the node is operative only when required.
Inputs
By default, the pSpawn node has a single orange input. Like most particle nodes, this orange input accepts only other particle nodes. You can enable an image input by selecting Bitmap from the Style menu in the Style tab. Also, two region inputs, one for bitmap and one for mesh, appear on the node
when you set the Region menu in the Region tab to either Bitmap or Mesh. The colors of these inputs change depending on the order they are enabled.
— Input: The orange input accepts the output of other particle nodes.
— Style Bitmap Input: This image input accepts a 2D image to use as the particles’ image. Since this image duplicates into potentially thousands of particles, it is best to keep these images small and square—for instance, 256 x 256 pixels.
— Region: The region inputs take a 2D image or a 3D mesh depending on whether you set the Region menu to Bitmap or Mesh. The color of the input is determined by whichever is selected first in the menu. The 3D mesh or a selectable channel from the bitmap defines the area where the particles are emitted.
Basic Node Setup
The pSpawn node is placed between the pEmitter and pRender nodes. Using the Age parameter in the pSpawn’s Conditions tab, you can spawn new particles as the old ones die off. This is one way to have a trail of particles shoot up in the air like a rocket and burst into sparkling fireworks.

A pSpawn node used to generate new particles at specific points in the old particles’ life
Inspector
![]()
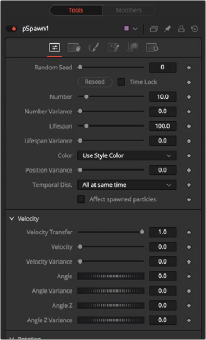
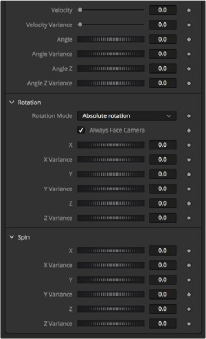
The pSpawn node has a large number of controls, most of which exactly duplicate those found within the pEmitter node. There are a few controls that are unique to the pSpawn node, and their effects are described below.


The pSpawn controls