< Previous | Contents | Next >
The Volume Mask node
Volume Mask Node Introduction
The Volume Mask node is used to create volumetric masks from images containing XYZ Position channels.
This can, for example, be used to isolate objects for color correction without the need to track or rotoscope the scene. See the “WPP Concept” section later in this chapter for further explanation on how this technology works and to learn about the required imagery.
Inputs
The following three inputs appear on the Volume Mask node in the Node Editor:
— Image: The orange image input accepts a 2D image containing a World Position Pass in the XYZ Position channels.
— Mask Image: An image can be connected to the green mask image input for refining the mask.
— Effect Mask: The blue input is for a mask shape created by polylines, basic primitive shapes, paint strokes, or bitmaps from other tools. Connecting a mask to this input limits the volume mask to certain areas.
Basic Node Setup
Below, a MediaIn labeled RGBA contains the main rendered image from a 3D scene. A World Position Pass from a 3D-rendered scene is labeled WPP_PASS. The Channel Booleans node is used to map the X position pass to the red channel, Y to the green channel, and Z to the blue channel. The Volume Mask tool extracts the 3D position information from the World Position Pass to place a mask in 3D space.
![]()
The mask is then used as an effect mask on a color corrector to selectively color correct objects in a 3D scene.
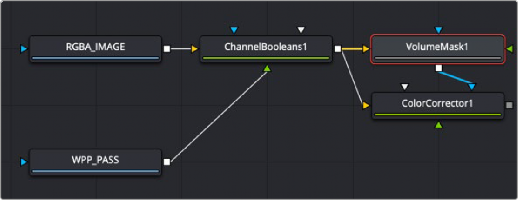
A Volume Mask tool takes advantage of World Position Pass for color correction in a 3D scene
Inspector
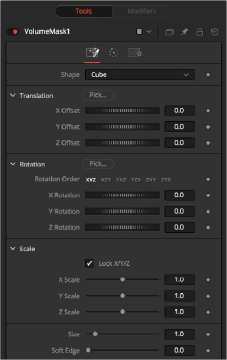
The Volume Mask Shape tab
Shape Tab
The Shape tab defines the size and location of the Volume Mask. You can either use the Pick buttons to select the location and orientation in the viewer or use the Translation, Rotation, and Scale controls.
![]()
This menu switches between a spherical or rectangular mask to be placed in your image. The mask can be further refined using the mask image input.
Drag the Pick button into the viewer to select XYZ coordinates from any 3D scene or 2D image containing XYZ values, like a rendered World Pass, to position the center of the Volume Mask. When picking from a 2D image, make sure it’s rendered in 32-bit float to get full precision.
These controls can be used to position the center of the mask manually or can be animated or connected to other controls in Fusion.
Drag the Pick button into the viewer to select rotational values from any 3D scene or 2D image containing those values, like an XYZ Normal pass, to reorient the mask.
When picking from a 2D image, like an XYZ Normal pass, make sure it’s rendered in 32-bit float, and use World Space coordinates to get full precision and the correct rotational values.
Use these controls to rotate the mask around its center.
Scale the mask in any direction from its center to further refine the overall Size value specified below.
The overall size, in X, Y, and Z, of the mask created.
Controls how much the Volume is faded toward the center from its perimeter to achieve a softer look.
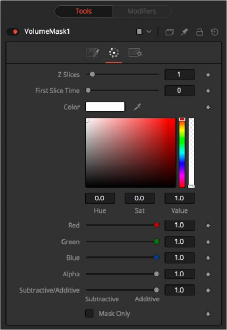
The Volume Mask Color tab
![]()
Color Tab
The Color tab controls the color and blending of the mask image.
Allows you to modify the color of the generated Volume Mask. This will add to any color provided by the connected mask image.
Similar to the Merge node, this value controls whether the mask is composed onto the image in Additive or Subtractive mode, leading to a brighter or dimmer appearance of the mask.
Outputs the generated mask on a black background, which then can be used as a mask on a Color Corrector for further refinement.
