< Previous | Contents | Next >
There are three methods in which the Camera Tracker node can analyze the scene, and each has its own strengths when dealing with certain types of camera movement.
— Tracker: Internally, all the Trackers use the Optical Flow Tracker to follow features over time and then further refine the tracks with the trusted Fusion Tracker or Planar Tracker. The Planar Tracker method allows the pattern to warp over time by various types of transforms to find the best fit.
These transforms are:
— Translation
— Translation and Rotation Translation, Rotation, and Scale Affine
— Perspective
It is recommended to use the default TRS setting when using the Planar Tracker. The Affine and Perspective settings need large patterns in order to track accurately.
— Close Tracks When Track Error Exceeds: Tracks will be automatically terminated when the tracking error gets too high. When tracking a feature, a snapshot of the pixels around a feature are taken at the reference time of the track. This is called a pattern, and that same pattern of pixels is searched for at future times. The difference between the current time pattern and the reference time pattern is called the track error. Setting this option higher produces longer but increasingly less accurate tracks.
— Solve Weight: By default, each track is weighted evenly in the solve process. Increasing a track’s weight means it has a stronger effect on the solved camera path. This is an advanced option that should be rarely changed.
![]()
Set a custom prefix name and/or color for the automatically generated tracks. This custom color will be visible when Track Colors in the Options tab is set to User Assigned.
Camera Tab
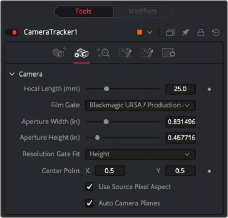
The Camera Tracker Camera tab
The controls of the Camera tab let you specify the physical aspects of the live-action camera, which will be used as a starting point when searching for solve parameters that match the real-
world camera. The more accurate the information provided in this section, the more accurate the camera solve.
The Camera tab includes controls relating to the lens and gate aspects of the camera being solved for.
Specify the known constant focal length used to shoot the scene or provide a guess if the Refine Focal Length option is activated in the Solve tab.
Choose a film gate preset from the drop-down menu or manually enter the film back size in the Aperture Width and Aperture Height inputs. Note that these values are in inches.
In the event that the camera used to shoot the scene is not in the preset drop-down menu, manually enter the aperture width (inches).
In the event that the camera used to shoot the scene is not in the preset drop-down menu, manually enter the aperture height (inches).

EXAMPLE: A 16:9 image is saved out of a full aperture-sized sensor.
Typically, fit to Width or Height is the best setting. The other fit modes are Inside, Outside, or Stretched.
EXAMPLE: A 16:9 image is saved out of a full aperture-sized sensor.
Typically, fit to Width or Height is the best setting. The other fit modes are Inside, Outside, or Stretched.
EXAMPLE: A 16:9 image is saved out of a full aperture-sized sensor.
Typically, fit to Width or Height is the best setting. The other fit modes are Inside, Outside, or Stretched.
This defines how the image fits the sensor size. Often, film sensors are sized to cover a number of formats, and only a portion of the sensor area is recorded into an image.
![]()
This is where the camera lens is aligned to the camera. The default is (0.5, 0.5), which is the middle of the sensor.
This will use the squeeze aspect of the pixels that is loaded in the image. HD is square pixels, but NTSC has a pixel aspect ratio of 0.9:1, and Anamorphic CinemaScope is 2:1 aspect. Disabling this option exposes Pixel X and Y number fields where you can customize the source pixel aspect.
When enabled, the camera’s image plane and far plane are automatically moved to enclose the point cloud whenever a solve completes. Sometimes, though, the solver can atypically fling points off really deep into the scene, consequently pushing the image plane very far out. This makes the resulting scene unwieldy to work with in the 3D views. In these cases, disable this option to override this default behavior (or delete the offending tracks).