< Previous | Contents | Next >
This menu determines how the Edges of the image are treated.
— Canvas: This causes the edges that are revealed by the shake to be the canvas color—usually transparent or black.
— Wrap: This causes the edges to wrap around (the top is wrapped to the bottom, the left is wrapped to the right, and so on).
— Duplicate: This causes the Edges to be duplicated, causing a slight smearing effect at the edges.
— Mirror: Image pixels are mirrored to fill to the edge of the frame.
Select this control to Invert any position, rotation, or scaling transformation. This option might be useful for exactly removing the motion produced in an upstream Camera Shake.
The Flatten Transform option prevents this node from concatenating its transformation with adjacent nodes. The node may still concatenate transforms from its input, but it will not concatenate its transformation with the node at its output.
Common Controls
The Settings tab in the Inspector is also duplicated in other Transform nodes. These common controls are described in detail at the end of this chapter in “The Common Controls” section.
![]()
Crop [Crp]
The Crop node
Crop Node Introduction

TIP: You can crop an image in the viewer by activating the Allow Box Selection in the upper- left corner of the viewer while the Crop node is selected and viewed. Then, drag a crop rectangle around the area of interest to perform the operation.
TIP: You can crop an image in the viewer by activating the Allow Box Selection in the upper- left corner of the viewer while the Crop node is selected and viewed. Then, drag a crop rectangle around the area of interest to perform the operation.
TIP: You can crop an image in the viewer by activating the Allow Box Selection in the upper- left corner of the viewer while the Crop node is selected and viewed. Then, drag a crop rectangle around the area of interest to perform the operation.

NOTE: Because this node changes the physical resolution of the image, animating the parameters is not advised.
NOTE: Because this node changes the physical resolution of the image, animating the parameters is not advised.
NOTE: Because this node changes the physical resolution of the image, animating the parameters is not advised.
The Crop node can be used to cut out a portion of an image or to offset the image into a larger image area. However, unlike using a mask, this node actually changes the resolution of the image.
Inputs
The single input on the Crop node is used to connect a 2D image for cropping.
— Input: The orange input is used for the primary 2D image you want to crop.
Basic Node Setup
Below, the Crop node is inserted between the MediaIn1 node and the background input of the Merge. Unlike using a mask tool, cropping the MediaIn1 changes the resolution of the clip. The cropped MediaIn1 node connected to the orange background input also sets the resolution of the Merge output.
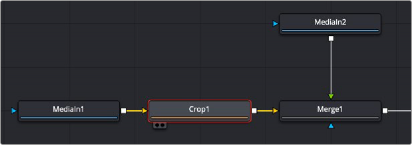
The Crop node can be used to cut out a portion of an image.
![]()
Inspector
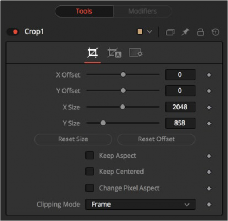
The Crop Controls tab
Controls Tab
The Controls tab provides XY Offset and XY Size methods for cropping the image.
These controls position the image off the screen by pushing it left/right or up/down. The cropped image disappears off the edges of the output image. The values of these controls are measured in pixels.
Use these controls to set the vertical and horizontal resolution of the image output by the Crop node. The values of these controls are measured in pixels.
When toggled on, the Crop node maintains the aspect of the input image.
When toggled on, the Crop node automatically adjusts the X and Y Offset controls to keep the image centered. The XY Offset sliders are automatically adjusted, and control over the cropping is done with the Size sliders or the Allow Box Selection button in the viewer.
This resets the image dimensions to the size of the input image.
This resets the X and Y Offsets to their defaults.
Enable this checkbox to reveal a Pixel Aspect control that can be used to change the image’s pixel aspect.
This option sets the mode used to handle the edges of the image when performing domain of definition (DoD) rendering. This is profoundly important for nodes like Blur, which may require samples from portions of the image outside the current domain.
— Frame: The default option is Frame, which automatically sets the node’s domain of definition to use the full frame of the image, effectively ignoring the current domain of definition. If the
![]()
upstream DoD is smaller than the frame, the remaining area in the frame will be treated as black/ transparent.
— Domain: Setting this option to Domain will respect the upstream DoD when applying the node’s effect. This can have adverse clipping effects in situations where the node employs a large filter.
— None: Setting this option to None does not perform any source image clipping at all. This means that any data required to process the node’s effect that would normally be outside the upstream DoD is treated as black/transparent.
Auto Crop Tab
Auto Crop tab analyzes the selected channel and crops the image based on that channel’s boundaries. The adjustments from auto crop are seen in the Crop tab parameters.
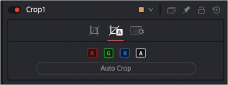
The Auto Crop tab