< Previous | Contents | Next >
Select which channels are examined for an Auto Crop. This is useful for auto cropping images with non-solid backgrounds in a specific color channel, like a blue color gradient. Toggling the channel off causes Auto Crop to ignore it when evaluating the image.
This evaluates the image and attempts to determine the background color. It then crops each side of the image to the first pixel that is not that color.
Common Controls
The Settings tab in the Inspector is also duplicated in other Transform nodes. These common controls are described in detail at the end of this chapter in “The Common Controls” section.
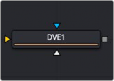
DVE [DVE]
The DVE node
DVE Node Introduction
![]()
The DVE (Digital Video Effects) node is a 3D-image transformation similar to nodes found in old,
tape-based online editing suites. The node encompasses image rotations, perspective changes, and Z moves. The axis can be defined for all transformations.
Inputs
The three inputs on the DVE node are used to connect a 2D image, DVE mask, and an effect mask, which can be used to limit the DVE area.
— Input: The orange input is used for the primary 2D image that is transformed by the DVE.
— DVE Mask: The white DVE mask input is used to mask the image prior to the DVE transform being applied. This has the effect of modifying both the image and the mask.
— Effect Mask: The blue input is for a mask shape created by polylines, basic primitive shapes, paint strokes, or bitmaps from other tools. Connecting a mask to this input causes the DVE to modify only the image within the mask. An effects mask is applied to the tool after the tool is processed.
Basic Node Setup
In the example below, the DVE node is inserted between the MediaIn2 node and the foreground input of the Merge. The MediaIn1 node is manipulated in the DVE node and composited over the top of the MediaIn1 node.
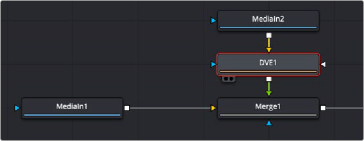
The DVE node modifying the foreground input of a Merge node
Inspector
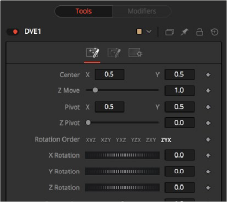
The DVE Controls tab
Controls Tab
![]()
The Controls tab includes all the transform parameters for the DVE.
Positions the axis of rotation and scaling. The default is 0.5, 0.5 for X and Y, which is in the center of the image, and 0 for Z, which is at the center of Z space.
Use these buttons to determine in what order rotations are applied to the image.
These controls are used to rotate the image around the pivot along the X-, Y- and Z-axis.
This positions the center of the DVE image onscreen. The default is 0.5, 0.5, which positions the DVE in the center of the image.
This zooms the image in and out along the Z-axis. Visually, when this control is animated, the effect is similar to watching an object approach from a distance.
This adds additional perspective to an image rotated along the X- or Y-axis, similar to changing the Field of View and zoom of a camera.
Masking Tab
The DVE node allows pre-masking of its input image. This offers the ability to create transformations from the masked area of the image while leaving the remainder of the image unaffected.
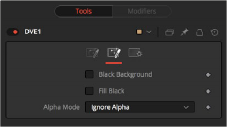
The DVE Masking tab
Unlike regular effect masks, the masking process occurs before the transformation. All the usual mask types can be applied to the DVE mask.
Toggle this on to erase the area outside the mask from the transformed image.
Toggle this on to erase the area within the mask (before transformation) from the DVE’s input, effectively cutting the masked area out of the image. Enabling both Black Background and Fill Black will show only the masked, transformed area.
This determines how the DVE will handle the alpha channel of the image when merging the transformed image areas over the untransformed image.
![]()
— Ignore Alpha: This causes the input image’s alpha channel to be ignored, so all masked areas will be opaque.
— Subtractive/Additive: These cause the internal merge of the pre-masked DVE image over the input image to be either Subtractive or Additive.
— An Additive setting is necessary when the foreground DVE image is premultiplied, meaning that the pixels in the color channels have been multiplied by the pixels in the alpha channel. The result is that transparent pixels are always black, since any number multiplied by 0 always equals 0. This obscures the background (by multiplying with the inverse of the foreground alpha), and then simply adds the pixels from the foreground.
— A Subtractive setting is necessary if the foreground DVE image is not premultiplied. The compositing method is similar to an Additive merge, but the foreground DVE image is first multiplied by its own alpha, to eliminate any background pixels outside the alpha area.
Common Controls
The Settings tab in the Inspector is also duplicated in other Transform nodes. These common controls are described in detail at the end of this chapter in “The Common Controls” section.