
< Previous | Contents | Next >
Using the Anim Curves Modifier with Paths
To understand how to use the Anim Curves modifier’s with a Path modifier, let’s use the premise that you want to create text that falls from the top of the frame and bounces as it reaches the bottom of the frame.
1 In Fusion, create two keyframes that cause text to start at the top of the frame and drop to the bottom. This automatically creates a Path modifier.
2 In the Inspector’s Modifier tab, right-click over the Displacement parameter and choose Insert > Anim Curves. The animation is normalized to the duration of the comp.
3 Set the Source menu to Duration, since this is not a transition and we are not customizing the duration.
4 From the Curve menu, choose Easing, then for the Out menu, choose Bounce.
5 Play the animation to see the Bounce animation.
6 To make the bounce occur halfway down the frame, change the Scale to .05.
7 To make the animation run twice as fast, enter 2.0 in the Time Scale parameter.
TIP: To view the resulting animation curve in the Spline Editor, select the parameter name in the Spline Editor’s header. The spline is updated as you change the controls.
TIP: To view the resulting animation curve in the Spline Editor, select the parameter name in the Spline Editor’s header. The spline is updated as you change the controls.
TIP: To view the resulting animation curve in the Spline Editor, select the parameter name in the Spline Editor’s header. The spline is updated as you change the controls.
Once you create a macro from this node tree and save it as a Title template, you can apply it in the Edit page Timeline. If you change the title’s duration in the Edit page, the animation timing will update appropriately.
![]()
Bézier Spline
The Bézier Spline is one of the animation modifiers in Fusion and is typically applied to numerical values rather than point values. It is automatically applied when you keyframe a parameter or each time you right-click a number field and select Animate.
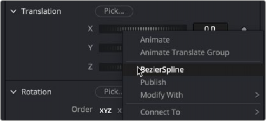
Bézier Spline modifier menu
Usage
You can add the Bézier Spline to the Spline Editor by right-clicking a number field and selecting BezierSpline. Since this is the most common choice for animation splines, it is separated from the Modify With menu for quicker access. Selecting BezierSpline from the menu adds a keyframe at the current location and displays a Bézier Spline in the Spline Editor.
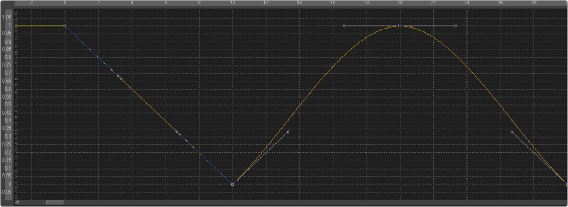
Bézier Spline Editor
Unlike most modifiers, this modifier has no actual Controls tab in the Inspector. However, the Spline Editor displays the Bézier Spline, and it can be controlled there. The Bézier Spline offers individual control over each control point’s smoothness using Bézier handles. The smoothness is applied in multiple ways:
— To make the control points smooth, select them, and press Shift-S. The handles can be used to modify the smoothness further.
![]()
— To make the control points linear, select them, and press Shift-L. These operations can also be performed using the contextual menu.
— Select the control point(s), right-click, and select Smooth or Linear. The menu also allows the user to smooth a spline using a convolution analysis called a Savitzky-Golay filter. Select the control point(s), right-click, and select Smooth Points -Y Dialog.
Ease In/Out
Traditional Ease In/Out can also be modified by using the number field virtual sliders in the Spline Editor. Select the control points you want to modify, right-click, and select Ease In/Out... from the contextual menu. Then use the number field virtual sliders to control the Ease In/Out numerically.

Spline Ease In/Out modifier