
< Previous | Contents | Next >
This checkbox is used to unlock the X- and Y-axis, revealing independent slider controls for each axis.
EXAMPLE
1. Create a new comp, and then add and view a Text node.
2. Type some text in the Text node.
3. In the viewer, right-click over the Center control of the text and choose Modify With > Shake Position.
4. In the Inspector, select the Modifiers tab and set the smoothing to 5.0.
5. Set the Minimum to 0.1 and the Maximum to 0.9.
This adds some chaotic movement to the text. However, we can change this over Go to frame 0 and in the Inspector click the Keyframe button to the right of both the Minimum and the Maximum controls.
6. Go to frame 0 and in the Inspector click the Keyframe button to the right of both the Minimum and the Maximum controls.
7. Go to frame 90 and adjust the Minimum to 0.45 and the Maximum to 0.55.
8. View the results.
Now, the text starts out by flying all over the screen and tightens in toward the center of the screen as the comp plays.
This control is used to determine the overall strength of the shake. The low values represent the lowest value that can be generated by the randomizer, and the high values represent the highest values. To create a Shake that moves a center crosshair anywhere within the image, set the Minimum to 0.0 and the Maximum to 1.0. To restrict the motion to a smaller shake in the bottom-right corner of the image, set the Minimum to 0.70 and the Maximum to 0.90.
![]()
Track
Although there is a standard Tracker node, you can also use a Tracker modifier to add a tracker directly to a parameter. To apply the Tracker modifier, in the viewer right-click the Center control of of any transform, text, mask, or other positionable element. From the contextual menu, choose Object x Center > Modify With > Tracker.
Then choose one of three options:
— Tracker Position: Tracks a point from the source.
— Steady Position: Stabilizes based on a single point in the source.
— Unsteady Position: Adds original motion back after stabilizing.
This adds a modifier in the Inspector with a set of controls almost identical to those found in the Tracker node itself.
Inspector
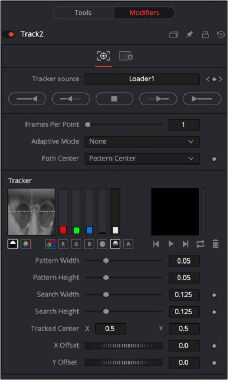
The Tracker modifier
For an in-depth explanation of this node, see Chapter 117, "Tracker Nodes," in the DaVinci Resolve Reference Manual, or Chapter 55 in the Fusion Reference Manual.
![]()
Tracker Modifier vs. Tracker Node
The differences between a Tracker modifier and a Tracker node are as follows:
— The Tracker modifier can only track a single pattern.
— The Tracker modifier can only output a single value and cannot be used for complex stabilization or match-moving procedures.
— The default source image for the modifier is the node immediately upstream of the node that contains the modifier (i.e., when adding a Tracker modifier to a Glow node with a Loader as its input, the Tracker Source input defaults to the output of the Loader). Set a different source image for the Tracker modifier by typing in the name of the node. Alternatively, drag the source node from the Node Editor into the Text Box control.

EXAMPLE
Imagine that you need to track an actor’s eyes so that an unearthly, alien glow can be applied to the eyes.
1. Select the Loader node.
2. Add a Glow node.
3. Add an Ellipse mask to the Glow in the shape of one of the eyes.
4. Right-click the center of that mask and select Modify With > Tracker > Position. Since the track is on the mask, the tracker takes the glow as the image for tracking.
This could cause problems since the eye might be very obscured by the glow. A cleaner source will be the Loader that feeds the glow.
5. Drag the Loader into the modifier Inspector’s Track Source field.
6. Track the actor’s eye.
7. Perform the same steps on the other eye.