< Previous | Contents | Next >
The XY Path type uses two separate splines for the position along the X-axis and for the position along the Y-axis.
To animate a coordinate control using an XY path, right-click the control and select Modify With > XY Path from the contextual menu.
At first glance, XY paths work like Displacement paths. To describe the path, change frames and position the control where it should be on that frame, and then change frames again and move the control to its new position. Fusion automatically interpolates between the points. The difference is that no keyframes are created on the onscreen path.
Look in the Spline Editor to find the X and Y channel splines. Changes to the control’s values are keyframed on these splines. The advantage to the XY path is that it becomes very easy to work with motion along an individual axis.
Inspector

![]()
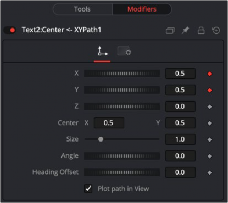
XY Path modifier controls
These reflect the position of the animated control using X, Y, and Z values.
The actual center of the path. This can be modified and animated as well to move the entire path around.
The size of the path. Again, this allows for later modification of the animation.
The angle of the path. Again, this allows for later modification of the animation.
If another control (for example, a mask’s Angle) is connected to the path’s heading, this control allows for adding or subtracting from the calculated angle.
Toggles whether or not the actual path is displayed in the views.
![]()
You can change the Default Path type to XY path (if this is the preferred type of animation). Open the Default category in the Global Preferences and locate the Point With drop-down menu. Change this from the current value to XY Path. The next time Animate is selected from a Coordinate control’s contextual menu, an XY path is used instead of a Displacement path.