
< Previous | Contents | Next >
— That clip is turned into an external matte in the current grade, which you can use as a matte for secondary adjustments, or as a compositing layer (in conjunction with the Layer mixer) for mixing textures or images with your grade.
— That clip is also automatically attached to the Media Pool clip that corresponds to the clip you’re grading as a clip matte, to help you keep track of which clips are using other clips as mattes.
For more information about the Media Pool, see Chapter 18, “Adding and Organizing Media with the Media Pool.”
Node Editor
The Node Editor is where you assemble one or more individual corrections (nodes) together into a complete multi-correction grade (node tree). This is a powerful way of assembling grades, since different types of nodes let you create different combinations of corrections and very specific adjustments by reordering operations, combining keys, or changing the layer order of different adjustments. For more information about the Node Editor, see Chapter 140, “Node Editing Basics.”
Node Editor to construct your grade processing signal flow
![]()
Timeline
The Timeline provides several ways of navigating the clips in your project, as well as keeping track of what has been done to which clips. The Timeline is divided into two parts, each of which shows different information and provides differing controls, and each of which can be opened or closed separately via the Clips and Timeline buttons on the Interface toolbar.

The Thumbnail timeline with a Mini-Timeline below
Thumbnail Timeline
At the top is the Thumbnail timeline, in which each clip is represented by a single frame. The Thumbnail timeline (or its alter-ego, the Lightbox) provides the easiest way of selecting which clip you want
to work on and of making clip selections for various grade management operations. The currently selected clip that reveals its controls in the various palettes of the Color page is highlighted in orange.
Much valuable information appears above and below each thumbnail, such as each clip’s clip number, source timecode, track number, whether it’s been flagged, whether it’s automatically linked or part of a group, whether it’s been tracked, and so on.
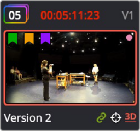
A clip thumbnail in the Thumbnail timeline
What’s displayed underneath each thumbnail can be changed by double-clicking the space underneath each thumbnail. There are several options; you can keep double-clicking to cycle among them:
— Clip format or codec (the default)
— Clip Name (clip name or file name, depending on what View > Show File Names is set to) or Multicam Angle (if you’re working with multicam clips)
— Version name or number
Mini-Timeline
Underneath, the Mini-Timeline shows a small representation of the video tracks of the Timeline in the Edit page wherein each clip is as long as its actual duration. This provides the best representation
![]()
of the structure of the current timeline, in which clip length shows duration and multiple tracks are displayed, so you can see which clips are superimposed. A Timeline Ruler lets you scrub the playhead across multiple clips and can be zoomed out enough to show every clip in your entire program.
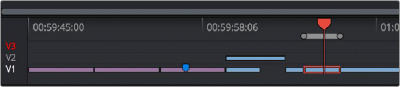
The Mini-Timeline lets you see timeline structure, and small track header controls let you enable tracks, disable tracks, and set the playhead to ignore specific tracks
Small track labels at the left of each track in the Mini-Timeline let you enable or disable tracks by clicking them (enabled tracks have white labels, disabled tracks have gray labels). Option-clicking one of these controls sets that track to be enabled but ignored by the playhead when you use the Next and Previous Clip commands, in the event you want to ignore clips you don’t need to grade (tracks in this mode show a red label).