< Previous | Contents | Next >
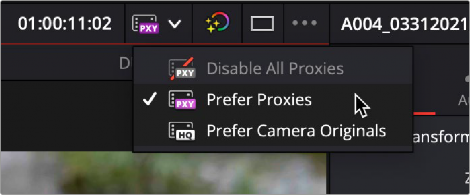
You can select which media you prefer to use in the Proxy Handling selector in the top right of the Viewer. This is a global setting that changes proxy handling for all the viewers across DaVinci Resolve.
![]()
The Proxy Handling Selector in the Viewer lets you choose which type of media to use.
Creating Proxy Files with the Blackmagic Proxy Generator
The Blackmagic Proxy Generator is a separate program that can automatically generate proxy media from master video files placed in a watch folder. This is a small, lightweight application that can be left to run in the background while importing media. This frees up your DaVinci Resolve program to do more creative tasks while the proxies are generated.
Using Watch Folders

IMPORTANT: The proxy media is generated inside a subfolder named “Proxy” at the same level in the file hierarchy as the original media file. This means that if your original media is all in the same folder, you will have one “Proxy” folder containing all of the proxy clips.
If your original media is all contained in separate folders (i.e., one folder for each video clip), you will have multiple “Proxy” folders, one inside every clip folder and containing one proxy clip each.

NOTE: You can not name a watch folder “proxy.” That name is reserved for the Proxy Generator.
NOTE: You can not name a watch folder “proxy.” That name is reserved for the Proxy Generator.
NOTE: You can not name a watch folder “proxy.” That name is reserved for the Proxy Generator.
Watch folders are simply specific folders in your OS that are constantly monitored by the Blackmagic Proxy Generator. When new files are added to the watch folder, the Blackmagic Proxy Generator is notified, and it automatically transcodes those new files into proxy media, without any additional human interaction needed. You can have as many different watch folders as you want; the only requirement is that the storage media the watch folder is on has enough space to hold both the original media files and the new proxy media.
You need to create at least one watch folder and can have as many different watch folders as you need. For example, you could have separate watch folders for each card, or scene, or date, or whatever makes the most sense for your workflow.
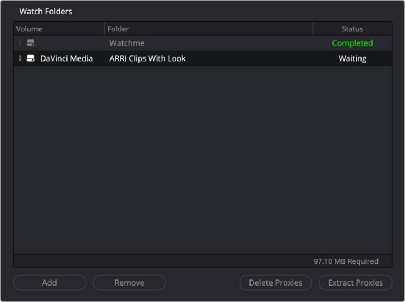
1 Select the Add button.
2 Create a new folder, or select an existing folder in the file system window.
3 Click on the open button.
![]()
The new watch folder will appear in the Watch Folders pane of the Blackmagic Proxy Generator and will display its location and current status.
When you’re finished using a specific watch folder, you can remove it from the Blackmagic Proxy Generator’s watch list. Removing a folder does not delete it or its files from your drive; it only stops the Blackmagic Proxy Generator from monitoring it.
1 Select the watch folder from the Watch Folders list.
2 Select the Remove button.
If you’ve accidentally removed the wrong watch folder, you can simply add it back again using the steps above.
You can see the status of all your watch folders in the Watch Folders section of the Blackmagic Proxy Generator. You can manually change the order that they appear in the list by dragging an entry up or down in the list. The estimated disk space required for the proxies can be found below, and there are three columns that contain information about each folder.
— Volume: This is the logical volume (disk, network storage, usb drive, etc.) that the watch folder is on. This lets you know which physical device needs to be attached to the computer for the Blackmagic Proxy Generator to function.
— Folder: This is the name of the Watch Folder. It does not show the folder’s path, only the name of the watch folder itself.
— Status: This column shows the current status of the files in the watch folder.
— Waiting: This folder has clips in it that have not been transcoded yet into proxies. It is waiting for the Blackmagic Proxy Generator to be started or for a folder ahead of it in the queue
to be finished.
— Processing (x/x): This folder has clips that are currently being transcoded. The number to the left of the slash is the current clip number, the number to the right is the total number of clips to be transcoded.
— Completed: This folder has finished transcoding all proxy files for the media in the folder.
![]()
The Watch Folders section of the Blackmagic Proxy Generator
Setting the Proxy Format
You can select the proxy codec you wish to use by selecting the format from this list.
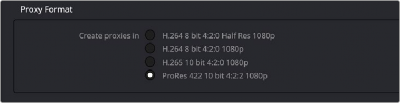
The Proxy Media Format section of the Blackmagic Proxy Generator
Starting and Stopping the Blackmagic Proxy Generator
Once you’ve set up a watch folder and selected a proxy format, all you need to do is select the Start button in the Processing pane to automatically transcode and monitor your watch folders. If you want to stop the process at any time, just select the Stop button. You can also toggle Start/Stop by pressing the space bar.
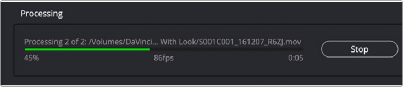
The Processing pane of the Blackmagic Proxy Generator
In the Processing pane, you can also see the status of the current job. The pane displays the progress of the job in terms of number of clips rendered (x of x), a progress bar, and a percentage indicator. It also displays the name of the current clip, the frames-per-second (fps) that the render is happening at, and an estimated time left to complete.